
1. บทนำ
The GeoVision GV-VS2400 is a compact and powerful 4-channel H.264 Video Server designed for converting analog video signals into high-resolution digital images. This device supports TVI 1080p/720p and analog 960H/D1 real-time video inputs, making it an integral part of a comprehensive IP surveillance solution when integrated with GV-System (GV-DVR/NVR) or GV-VMS.
Key features include support for over 50 PTZ camera models, local video recording to USB storage, and a Tampering Alarm system to enhance security. The GV-VS2400 is suitable for various surveillance applications requiring reliable video digitization and management.
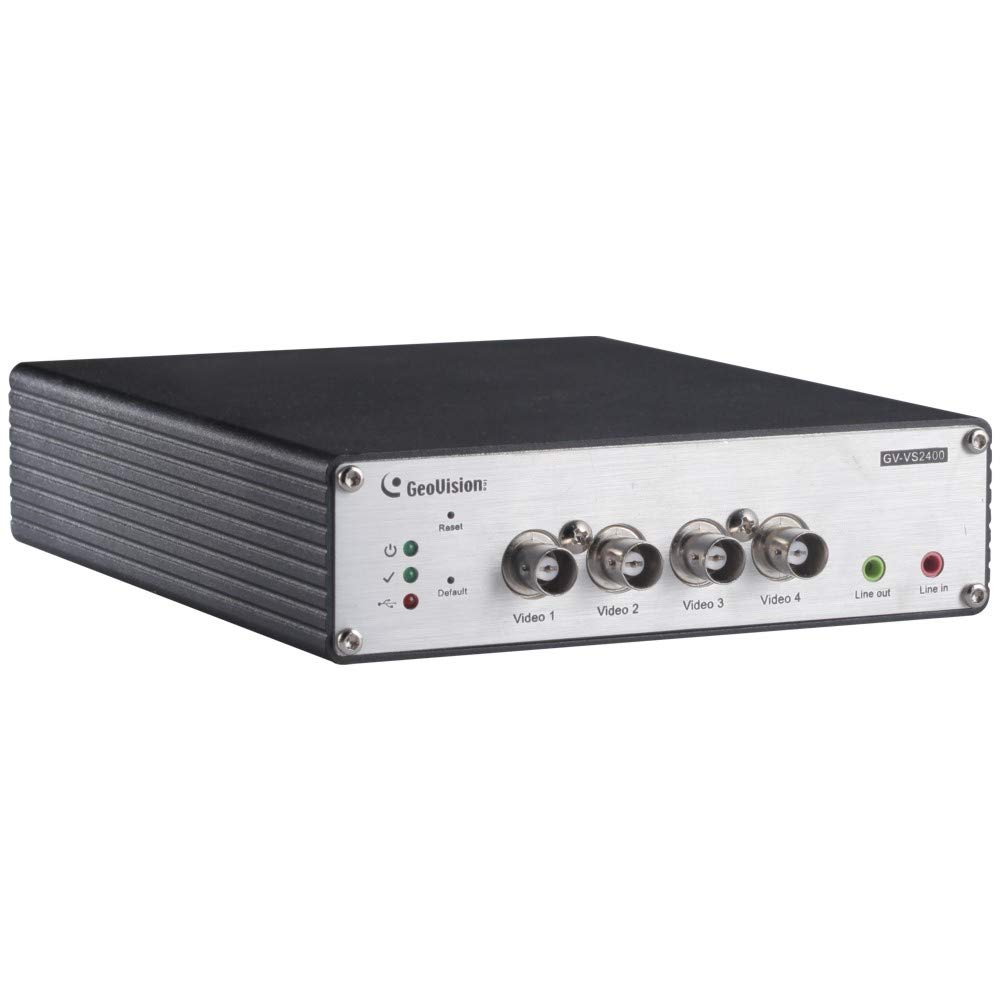
รูปที่ 1 : ด้านหน้า view of the GeoVision GV-VS2400 Video Server, showing its compact design and ports.
2. การตั้งค่า
2.1 เนื้อหาบรรจุภัณฑ์
ก่อนเริ่มการติดตั้ง โปรดตรวจสอบให้แน่ใจว่ามีอุปกรณ์ครบถ้วนตามที่ระบุในบรรจุภัณฑ์:
- GV-VS2400 Video Server Unit
- อะแดปเตอร์ไฟฟ้า (12V DC)
- คู่มือเริ่มต้นอย่างรวดเร็ว
- Software CD (GV-System/GV-VMS)
- ชุดติดตั้ง (ถ้ามี)
2.2 การติดตั้งฮาร์ดแวร์
- เชื่อมต่อกล้อง: Connect up to four TVI 1080p/720p or analog 960H/D1 cameras to the video input ports on the GV-VS2400. Ensure secure connections.
- การเชื่อมต่อเครือข่าย: Connect the GV-VS2400 to your network using an Ethernet cable. Alternatively, configure Wi-Fi or 3G/4G connectivity as required.
- อุปกรณ์จัดเก็บข้อมูล USB (ไม่บังคับ): For local recording, connect a compatible USB HDD to the USB port on the GV-VS2400.
- การเชื่อมต่อไฟฟ้า: Connect the 12V DC power adapter to the GV-VS2400 and then plug it into a power outlet. The device will power on automatically.
รูปที่ 2: ด้านหลัง view of the GV-VS2400, illustrating video input, network, and power connections.
2.3 การกำหนดค่าเริ่มต้น
After hardware installation, access the device's web interface for initial configuration:
- ค้นพบอุปกรณ์: Use the GeoVision IP Device Utility software (available on the provided CD or GeoVision website) to discover the GV-VS2400 on your network.
- เข้าถึง Web อินเทอร์เฟซ: เปิด web browser and enter the IP address of the GV-VS2400. Log in using the default credentials (refer to the Quick Start Guide for details).
- การตั้งค่าเครือข่าย: Configure network settings, including IP address, subnet mask, and gateway, to match your network environment.
- การตั้งค่าวิดีโอ: Adjust video input settings for each connected camera, including resolution, frame rate, and compression (H.264).
- การควบคุม PTZ: If using PTZ cameras, configure the appropriate PTZ protocol and settings.
- การกำหนดค่าการจัดเก็บข้อมูล: Format and configure the connected USB HDD for video recording.
3. Operating the GV-VS2400
3.1 สด View และการบันทึก
The GV-VS2400 can be monitored and managed through its web interface or integrated with GeoVision's GV-System/GV-VMS software.
- สด View: Access the live video streams from connected cameras through the web อินเทอร์เฟซหรือซอฟต์แวร์ไคลเอ็นต์
- การบันทึกด้วยตนเอง: Initiate manual recording of video streams to the configured USB storage or network storage.
- การบันทึกตามกำหนดเวลา: Set up recording schedules based on time or events (e.g., motion detection).
3.2 ตampกำลังปลุก
ทีampering Alarm feature detects attempts to obstruct or disable cameras.
- เปิดใช้งาน Tampการตรวจจับการสั่น: ใน web interface, navigate to the camera settings and enable the Tampering Alarm for desired channels.
- Configure Actions: Specify actions to be taken when a tampering event is detected, such as sending notifications, triggering recording, or activating an alarm output.
3.3 การเข้าถึงผ่านอุปกรณ์เคลื่อนที่
The GV-VS2400 supports remote access via mobile devices using GeoVision's mobile applications.
- ดาวน์โหลดแอพ: Download the appropriate GeoVision mobile app from your device's app store.
- เพิ่มอุปกรณ์: Add the GV-VS2400 to the app using its IP address or QR code.
- View Live Feeds: Access live video feeds and manage basic settings remotely.
4. การบำรุงรักษา
การอัปเดตเฟิร์มแวร์ 4.1 รายการ
ตรวจสอบและติดตั้งเฟิร์มแวร์อัปเดตเป็นประจำเพื่อให้มั่นใจได้ถึงประสิทธิภาพและความปลอดภัยสูงสุด
- Visit the official GeoVision webเว็บไซต์สำหรับเวอร์ชั่นเฟิร์มแวร์ล่าสุด
- Follow the provided instructions for firmware update procedures.
4.2 การสำรองข้อมูลและกู้คืนระบบ
It is recommended to regularly back up your system configurations.
- ใช้ web interface to export configuration files.
- Store backup files in a secure location.
4.3 การทำความสะอาด
Keep the device clean to prevent dust accumulation and ensure proper ventilation.
- ใช้ผ้าแห้งนุ่มๆ ทำความสะอาดด้านนอกของตัวเครื่อง
- ห้ามใช้น้ำยาทำความสะอาดหรือวัสดุที่มีฤทธิ์กัดกร่อน
5 การแก้ไขปัญหา
| ปัญหา | สาเหตุที่เป็นไปได้ | สารละลาย |
|---|---|---|
| ไม่มีสัญญาณภาพ |
|
|
| ไม่สามารถเข้าถึงได้ web อินเทอร์เฟซ |
|
|
| การบันทึกไม่ทำงาน |
|
|
6. ข้อมูลจำเพาะ
| คุณสมบัติ | คำอธิบาย |
|---|---|
| แบบอย่าง | GV-VS2400 |
| อินพุตวิดีโอ | 4-channel TVI 1080p / 720p, Analog 960H / D1 |
| การบีบอัดวิดีโอ | เอช.264 |
| ความละเอียดสูงสุด | Up to 2 Megapixels (digitized) |
| การเชื่อมต่อ | Ethernet, Wi-Fi, USB, UMTS / 3G / 3.5G / 4G |
| พื้นที่จัดเก็บ | USB HDD (for local recording) |
| การสนับสนุน PTZ | Supports over 50 PTZ models |
| กำลังไฟเข้า | กระแสตรง 12 โวลต์ |
| คุณสมบัติพิเศษ | Tampering Alarm, Automatic switch between WiFi and 3G, Multi-language web interface (29 languages) |
7. การรับประกันและการสนับสนุน
7.1 การรับประกันสินค้า
GeoVision products typically come with a limited warranty. Please refer to the warranty card included with your product or visit the official GeoVision website for detailed warranty terms and conditions specific to the GV-VS2400. Keep your proof of purchase for warranty claims.
7.2 การสนับสนุนด้านเทคนิค
For technical assistance, product inquiries, or troubleshooting beyond this manual, please contact GeoVision technical support:
- Webเว็บไซต์: Visit the official GeoVision webเว็บไซต์นี้เป็นแหล่งรวบรวมข้อมูลสนับสนุน คำถามที่พบบ่อย และไฟล์ดาวน์โหลดไดรเวอร์
- ข้อมูลติดต่อ: Refer to the GeoVision website for regional contact numbers and email addresses for technical support.
- แหล่งข้อมูลออนไลน์: Explore GeoVision's online knowledge base and forums for community support and additional information.