
Memphis Audio SRX750D.1
Memphis Audio SRX750D.1 Street Reference Series Mono Subwoofer Ampคู่มือการใช้งาน lifier
Model: SRX750D.1
การแนะนำ
This manual provides detailed instructions for the installation, operation, and maintenance of your Memphis Audio SRX750D.1 Street Reference Series Mono Subwoofer Ampเครื่องขยายเสียง โปรดอ่านคู่มือนี้อย่างละเอียดก่อนทำการติดตั้งหรือใช้งาน เพื่อให้มั่นใจได้ว่าใช้งานได้อย่างถูกต้องและป้องกันความเสียหายต่อตัวเครื่องหรือระบบเสียงในรถยนต์ของคุณ
The SRX750D.1 amplifier is designed to deliver reliable performance and powerful bass output for your car audio system. It features a textured aluminum heatsink, high-level inputs, selectable bass boost, remote level control, and a variable crossover network.
ข้อควรระวังเพื่อความปลอดภัย
- ควรตัดการเชื่อมต่อขั้วลบของแบตเตอรี่รถยนต์ทุกครั้งก่อนเริ่มการติดตั้ง
- ตรวจสอบให้แน่ใจว่าสายไฟทั้งหมดได้รับการเดินสายและยึดอย่างถูกต้องเพื่อป้องกันความเสียหายหรือไฟฟ้าลัดวงจร
- Use appropriate gauge wiring as recommended in the specifications section.
- หลีกเลี่ยงการติดตั้ง ampควรติดตั้งเครื่องขยายเสียงในบริเวณที่โดนแสงแดดโดยตรง ความร้อนสูง ความชื้น หรือฝุ่นละอองมากเกินไป
- ห้ามใช้งาน ampหากเครื่องขยายเสียงชำรุดหรือทำงานผิดปกติ โปรดดูส่วนการแก้ไขปัญหาหรือติดต่อฝ่ายสนับสนุน
- ขอแนะนำให้ติดตั้งโดยผู้เชี่ยวชาญเพื่อประสิทธิภาพและความปลอดภัยที่เหมาะสมที่สุด
เนื้อหาแพ็คเกจ
ตรวจสอบว่ามีรายการทั้งหมดอยู่ในแพ็คเกจ:
- Memphis Audio SRX750D.1 Mono Subwoofer Ampชีวิต
- ปุ่มปรับเสียงเบสแบบรีโมท
- ฮาร์ดแวร์สำหรับติดตั้ง
- คู่มือการใช้งาน (เอกสารนี้)
การติดตั้งและการตั้งค่า
1. การเลือกตำแหน่งติดตั้ง
Select a location that provides adequate ventilation for the amplifier's heatsink. Avoid mounting directly on carpet or in enclosed spaces without airflow. Common locations include under seats, in the trunk, or on a custom ampชั้นวางไลไฟเออร์

รูปที่ 1: มุม view of the SRX750D.1 amplifier, highlighting its heatsink design.
2. การเดินสายไฟ
- การตัดการเชื่อมต่อแบตเตอรี่: Disconnect the negative (-) terminal of your vehicle's battery.
- สายไฟ: Run a 4-gauge power cable (Recommended Amp Kit: 4GKIT) from the positive (+) terminal of the battery to the amplifier's power input. Install an inline fuse holder within 18 inches (45 cm) of the battery. The fuse rating should match the amplifier's requirements (refer to specifications).
- Ground Cable: Connect a 4-gauge ground cable from the amplifier's ground terminal to a clean, unpainted metal surface on the vehicle's chassis. Ensure a solid, low-resistance connection. The ground cable should be as short as possible, ideally less than 3 feet (1 meter).
- เปิดเครื่องระยะไกล: เชื่อมต่อสายเปิด/ปิดระยะไกล (โดยทั่วไปคือสายขนาด 18 เกจ) จากช่องต่อสัญญาณรีโมทของเครื่องเล่นในรถไปยัง... ampขั้ว REM ของเครื่องขยายเสียง สายนี้ส่งสัญญาณ ampเครื่องขยายเสียงเพื่อเปิดและปิดโดยใช้เครื่องเสียงหลักของคุณ
3. Signal Input Wiring
The SRX750D.1 supports both low-level (RCA) and high-level inputs.
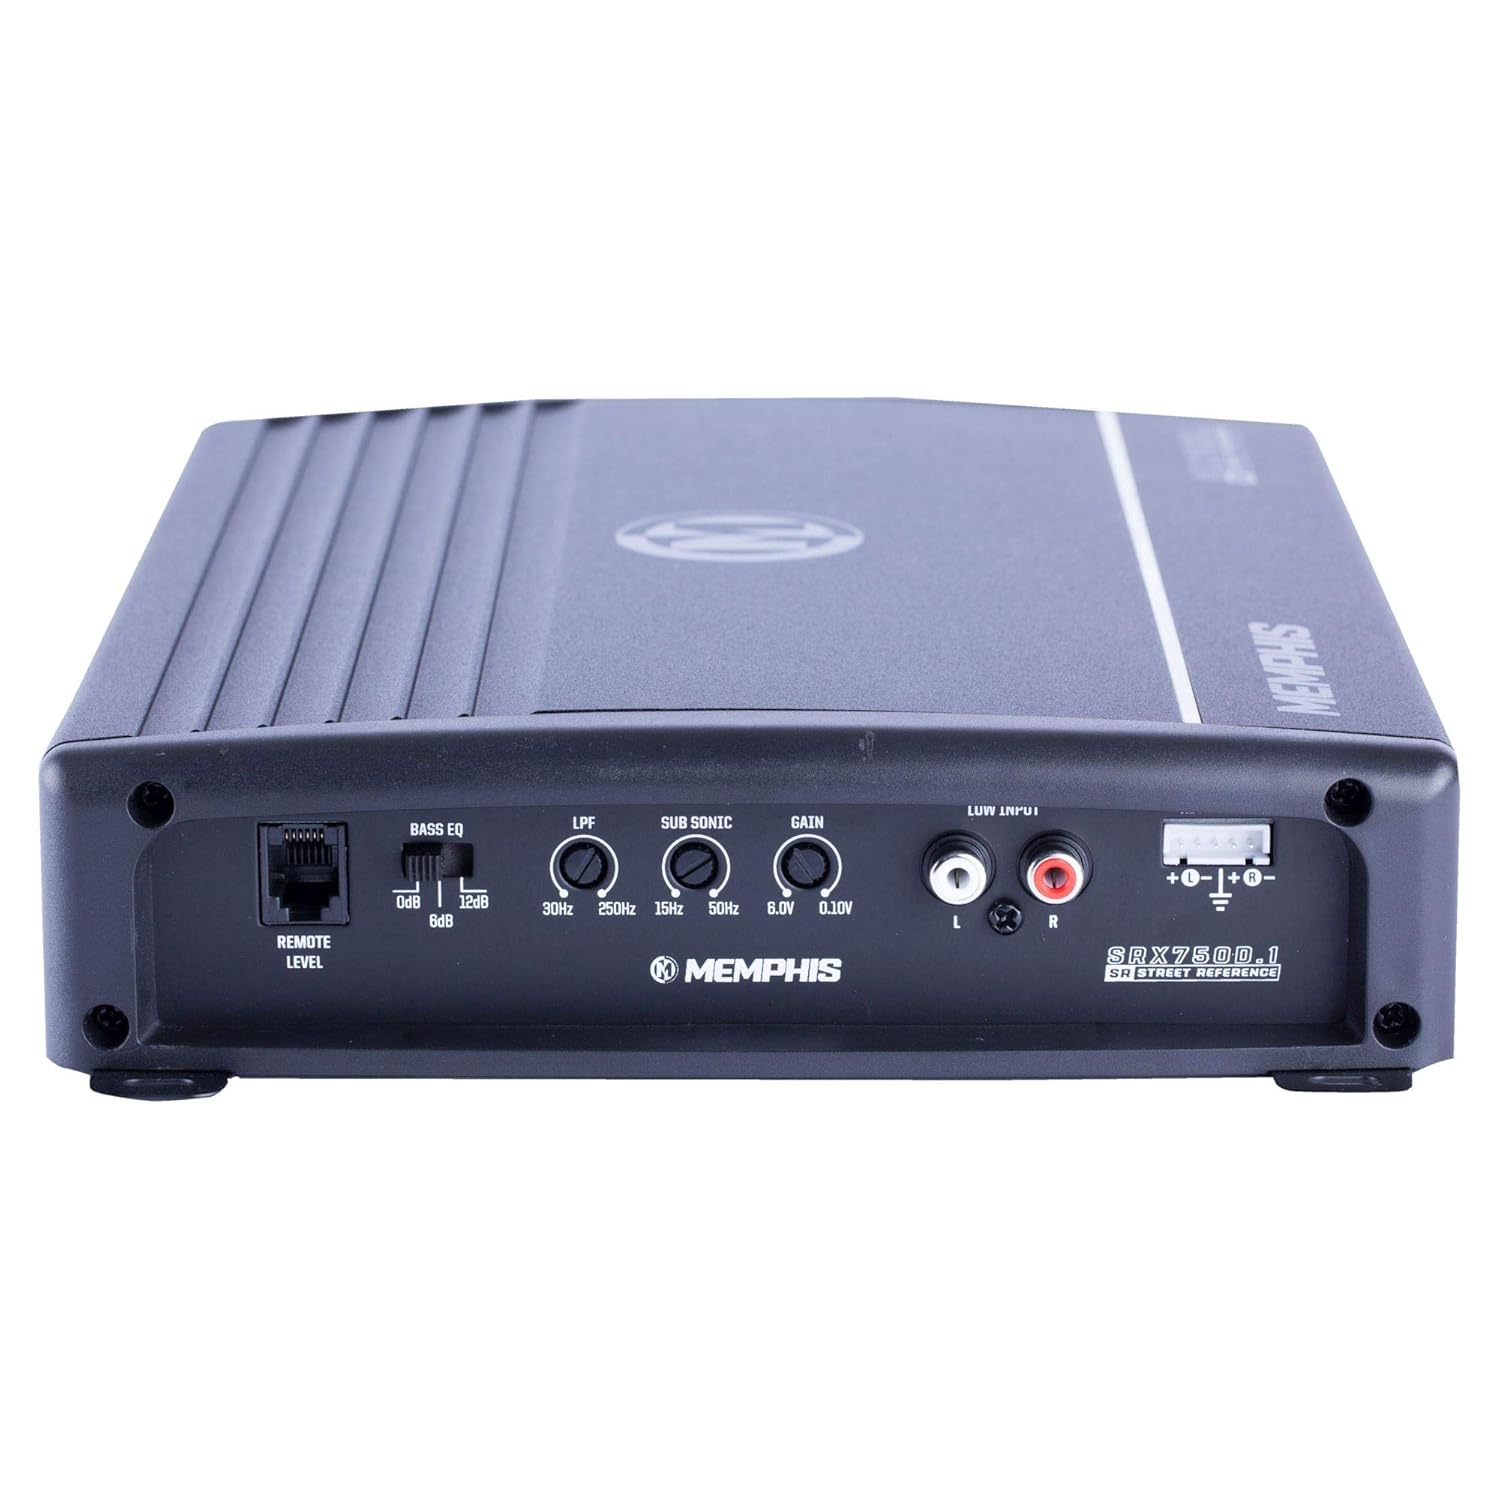
Figure 2: Rear panel of the SRX750D.1 amplifier with input and control connections.
- อินพุตระดับต่ำ (RCA): เชื่อมต่อสาย RCA จากช่องต่อซับวูฟเฟอร์หรือช่องต่อลำโพงฟูลเรนจ์ของเครื่องเล่นในรถเข้ากับ... amplifier's "LOW INPUT" RCA jacks.
- อินพุตระดับสูง: หากเครื่องเล่นในรถของคุณไม่มีช่องต่อ RCA ให้ใช้ช่องต่อสัญญาณระดับสูง ต่อสายลำโพงจากเครื่องเล่นในรถของคุณเข้ากับช่องต่อสัญญาณระดับสูงโดยตรง amplifier's high-level input terminal. Refer to your head unit's manual for speaker wire polarity.
4. การเดินสายเอาต์พุตลำโพง
เชื่อมต่อซับวูฟเฟอร์ของคุณเข้ากับ amplifier's speaker output terminals. Ensure correct polarity (+ to + and - to -). The SRX750D.1 is a mono amplifier, designed for a single subwoofer or multiple subwoofers wired to a final impedance of 2 ohms or 4 ohms.
Important: Do not wire the amplifier below a 2-ohm load, as this can cause damage and void the warranty.
5. Remote Bass Knob Installation
Connect the included remote bass knob to the "REMOTE LEVEL" port on the amplifier. Mount the knob in a convenient location for easy access while driving. This allows for real-time adjustment of the subwoofer output level.
คำแนะนำการใช้งาน
1. การเพิ่มพลังครั้งแรก
After all connections are made and verified, reconnect the vehicle's battery negative terminal. Turn on your head unit. The amplifier should power on, indicated by an LED indicator (if present).
2. การปรับกำไร
The "GAIN" control matches the amplifier's input sensitivity to the output level of your head unit. This is not a volume control. To set the gain:
- หมุน amplifier's gain control to its minimum (counter-clockwise) setting.
- ตั้งระดับเสียงของเครื่องเล่นในรถของคุณไว้ที่ประมาณ 75% ของระดับเสียงสูงสุด
- Play a dynamic piece of music with strong bass.
- ค่อยๆเพิ่ม amplifier's gain control (clockwise) until you hear distortion, then back it off slightly until the sound is clear.
3. Crossover Settings (LPF)
The "LPF" (Low Pass Filter) control allows only frequencies below the set point to pass through to the subwoofer. This is crucial for blending the subwoofer with your main speakers.
- Adjust the LPF control (30Hz - 250Hz) to a frequency typically between 80Hz and 120Hz, depending on your subwoofer and main speaker capabilities.
- Experiment with different settings to achieve the best sound integration.
4. Sub Sonic Filter
The "SUB SONIC" filter removes extremely low frequencies that your subwoofer cannot reproduce effectively, preventing wasted power and potential damage. Set this filter slightly below your LPF setting, typically around 20Hz-30Hz.
5. Bass EQ / Bass Boost
The "BASS EQ" or "BASS BOOST" control provides an adjustable boost at a specific low frequency (e.g., 0dB to +12dB). Use this sparingly to enhance bass impact. Excessive boost can lead to distortion and damage.
การซ่อมบำรุง
- การทำความสะอาด: ทำความสะอาด .เป็นระยะ ampเช็ดทำความสะอาดภายนอกของเครื่องฉายรังสีด้วยผ้านุ่มและแห้ง ห้ามใช้สารเคมีรุนแรงหรือน้ำยาทำความสะอาดที่มีฤทธิ์กัดกร่อน
- การระบายอากาศ : Ensure the heatsink fins remain clear of obstructions to allow for proper cooling. Dust or debris buildup can impair cooling performance.
- การเชื่อมต่อ: Occasionally check all power, ground, and signal connections to ensure they are secure and free from corrosion.
- การเปลี่ยนฟิวส์: หากมีการ amplifier's fuse blows, replace it only with a fuse of the exact same type and rating. Using an incorrect fuse can cause severe damage or fire.
การแก้ไขปัญหา
| ปัญหา | สาเหตุที่เป็นไปได้ | สารละลาย |
|---|---|---|
| ไม่มีไฟฟ้า / Amplifier ไม่เปิด |
|
|
| ไม่มีเสียงออก |
|
|
| เสียงผิดเพี้ยน |
|
|
| Ampเครื่องทำความร้อนร้อนเกินไป |
|
|
ข้อมูลจำเพาะ
| คุณสมบัติ | ข้อมูลจำเพาะ |
|---|---|
| แบบอย่าง | SRX750D.1 |
| RMS กำลัง @ 4Ω | 400 วัตต์ x 1 |
| RMS กำลัง @ 2Ω | 750 วัตต์ x 1 |
| ค่า THD% ที่ 4Ω | <1% |
| การตอบสนองความถี่ | 30Hz - 250Hz |
| ช่วงอินพุต | 120มิลลิโวลต์ - 6.1โวลต์ |
| ขนาด (กว้าง x ยาว x สูง) | 15 x 9.45 x 3.5 นิ้ว |
| เล่มที่tage | 6.1 Volts (Input/Supply) |
| วัสดุ | อลูมิเนียม |
| น้ำหนักสินค้า | 7 ปอนด์ |
| จำนวนช่องสัญญาณ | 1 (ขาวดำ) |
| ที่แนะนำ Amp ชุด | 4GKIT (4-Gauge) |
| คุณสมบัติ | Textured aluminum heatsink, High level inputs, Selectable bass boost, Remote level control/bass knob, Variable crossover network |
การรับประกันและการสนับสนุน
ข้อมูลการรับประกัน
The Memphis Audio SRX750D.1 ampเครื่องขยายเสียงมาพร้อมกับ รับประกันจำกัด 1 ปี from the date of purchase. This warranty covers defects in materials and workmanship under normal use. It does not cover damage caused by improper installation, accident, misuse, abuse, negligence, or unauthorized modification.
โปรดเก็บหลักฐานการซื้อของคุณไว้เพื่อเรียกร้องการรับประกัน
การสนับสนุนลูกค้า
หากต้องการความช่วยเหลือด้านเทคนิค บริการรับประกัน หรือสอบถามข้อมูลเพิ่มเติม โปรดติดต่อฝ่ายบริการลูกค้าของ Memphis Audio โปรดดูข้อมูลอย่างเป็นทางการจาก Memphis Audio webเว็บไซต์สำหรับข้อมูลการติดต่อล่าสุด
แหล่งข้อมูลออนไลน์: www.memphiscaraudio.com
เอกสารที่เกี่ยวข้องSRX750D.1


Ask a question about this manual
Ask about setup, troubleshooting, compatibility, parts, safety, or missing instructions. Manuals+ will review the question and use this page’s manual context to help answer it.