1. บทนำ
This manual provides comprehensive instructions for the installation, operation, and maintenance of your Supermicro X11SSZ-F-O Micro ATX Motherboard. Please read this manual thoroughly before beginning installation to ensure proper setup and to maximize the performance and longevity of your system.
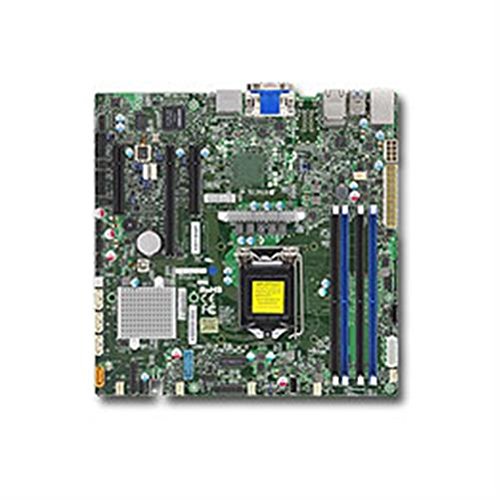
Figure 1: Supermicro X11SSZ-F-O Micro ATX Motherboard. This image displays the motherboard with its various components, including the CPU socket, DIMM slots, and expansion slots.
2. ข้อมูลด้านความปลอดภัย
โปรดปฏิบัติตามข้อควรระวังด้านความปลอดภัยต่อไปนี้เสมอ เพื่อป้องกันความเสียหายต่อเมนบอร์ดและอันตรายต่อตัวคุณเอง:
- ถอดสายไฟออกจากเต้ารับที่ผนังก่อนทำการติดตั้งหรือถอดอุปกรณ์ใดๆ
- สวมสายรัดข้อมือป้องกันไฟฟ้าสถิตและทำงานบนแผ่นรองป้องกันไฟฟ้าสถิตเพื่อป้องกันความเสียหายจากประจุไฟฟ้าสถิต (ESD) ต่อชิ้นส่วนที่ไวต่อไฟฟ้าสถิต
- จับเมนบอร์ดที่ขอบเพื่อหลีกเลี่ยงการสัมผัสชิ้นส่วนหรือวงจรต่างๆ
- Ensure proper ventilation in your system chassis to prevent overheating.
- เก็บเมนบอร์ดให้ห่างจากความชื้นและอุณหภูมิที่สูงหรือต่ำเกินไป
3. เนื้อหาบรรจุภัณฑ์
Verify that all items are present in your motherboard package. Typical contents include:
- Supermicro X11SSZ-F-O Motherboard
- I / O Shield
- สาย SATA
- Driver CD/DVD or USB drive
- Quick Installation Guide or User Manual
หากมีรายการใดขาดหายหรือเสียหาย โปรดติดต่อผู้ขายของคุณทันที
4. การตั้งค่าและการติดตั้ง
4.1. รายการตรวจสอบก่อนการติดตั้ง
- Ensure your power supply is compatible with the motherboard's power connectors (24-pin ATX and 8-pin EPS).
- Prepare your CPU, CPU cooler, DDR4 memory modules, and storage devices.
- Have a Phillips head screwdriver ready.
4.2. การติดตั้ง CPU (LGA 1151)
- ค้นหาซ็อกเก็ต LGA 1151 บนเมนบอร์ด
- Gently push down the load lever and pull it away from the socket to open the CPU retention frame.
- วางซีพียูให้ตรงกับซ็อกเก็ตอย่างระมัดระวัง ตรวจสอบให้แน่ใจว่าสามเหลี่ยมสีทองบนซีพียูตรงกับสามเหลี่ยมบนซ็อกเก็ต อย่าฝืนดันซีพียูเข้าไปในซ็อกเก็ต
- Lower the retention frame over the CPU and push the load lever back into place until it clicks.
- ติดตั้งตัวระบายความร้อน CPU ตามคำแนะนำของผู้ผลิต
4.3. การติดตั้งหน่วยความจำ (DDR4)
- ค้นหาช่องเสียบ DDR4 DIMM ทั้งสี่ช่อง
- เปิดคลิปที่ปลายทั้งสองด้านของช่อง DIMM
- จัดตำแหน่งโมดูลหน่วยความจำให้ตรงกับช่อง โดยให้แน่ใจว่ารอยบากบนโมดูลตรงกับกุญแจในช่อง
- กดปลายทั้งสองข้างของโมดูลหน่วยความจำให้แน่นจนกระทั่งคลิปล็อคเข้าที่
4.4. การติดตั้งการ์ดขยาย
- Identify the desired PCI Express slot (1x PCI-E 3.0 x16, 2x PCI-E 3.0 x8).
- Remove the corresponding metal slot cover from your chassis.
- Align the expansion card with the slot and press down firmly until it is securely seated.
- ยึดการ์ดให้แน่นด้วยสกรูหรือคลิปล็อก
4.5. การติดตั้งอุปกรณ์จัดเก็บข้อมูล (SATA)
- Connect one end of a SATA data cable to one of the four SATA3 ports on the motherboard.
- Connect the other end of the SATA data cable to your storage device (HDD/SSD).
- เชื่อมต่อสายไฟ SATA จากแหล่งจ่ายไฟของคุณไปยังอุปกรณ์จัดเก็บข้อมูล
4.6. การเชื่อมต่ออุปกรณ์ต่อพ่วง
- ขั้วต่อสายไฟ: Connect the 24-pin ATX and 8-pin EPS power cables from your power supply to the motherboard.
- ขั้วต่อแผงด้านหน้า: Connect the power switch, reset switch, HDD LED, and power LED cables from your chassis to the corresponding pins on the motherboard's front panel header. Refer to the motherboard diagram for pin assignments.
- หัวต่อ USB: เชื่อมต่อพอร์ต USB ด้านหน้าเข้ากับหัวต่อ USB บนเมนบอร์ด
- ส่วนหัวของไฟล์เสียง: เชื่อมต่อแจ็คเสียงด้านหน้าเข้ากับหัวต่อเสียงบนเมนบอร์ด
5. คู่มือการใช้งาน
5.1. การบูตครั้งแรกและการตั้งค่า BIOS/UEFI
- หลังจากประกอบระบบเสร็จแล้ว ให้เชื่อมต่อจอภาพ คีย์บอร์ด และเมาส์
- Power on the system. During the Power-On Self-Test (POST), press the designated key (usually เดล or F2) เพื่อเข้าสู่ยูทิลิตี้การตั้งค่า BIOS/UEFI
- Configure essential settings such as date and time, boot order, and enable/disable integrated peripherals as needed.
- บันทึกการเปลี่ยนแปลงและออกจาก BIOS/UEFI ระบบจะรีสตาร์ท
5.2. การติดตั้งระบบปฏิบัติการและไดรเวอร์
- ใส่สื่อการติดตั้งระบบปฏิบัติการของคุณ (ไดรฟ์ USB หรือ DVD)
- ทำตามคำแนะนำบนหน้าจอเพื่อติดตั้งระบบปฏิบัติการของคุณ
- Once the operating system is installed, install the necessary drivers from the provided driver CD/DVD/USB or download the latest drivers from the Supermicro website. Key drivers include chipset, audio, and LAN drivers.
6. การบำรุงรักษา
- การทำความสะอาด: ควรทำความสะอาดฝุ่นภายในเคสคอมพิวเตอร์เป็นระยะ โดยเฉพาะบริเวณพัดลมและแผ่นระบายความร้อน โดยใช้ลมเป่าอัดแรงดันสูง ตรวจสอบให้แน่ใจว่าได้ปิดเครื่องและถอดปลั๊กออกก่อนทำความสะอาด
- อัปเดต BIOS/UEFI: ตรวจสอบ Supermicro webเว็บไซต์นี้เป็นแหล่งอัปเดต BIOS/UEFI การอัปเดตจะช่วยเพิ่มเสถียรภาพ ความเข้ากันได้ และประสิทธิภาพ โปรดปฏิบัติตามคำแนะนำในการอัปเดตอย่างระมัดระวังเพื่อหลีกเลี่ยงความเสียหายต่อเมนบอร์ด
- การอัปเดตไดรเวอร์: หมั่นอัปเดตไดรเวอร์ระบบของคุณอยู่เสมอ เพื่อให้มั่นใจได้ถึงประสิทธิภาพสูงสุดและความเข้ากันได้กับซอฟต์แวร์และฮาร์ดแวร์ใหม่ๆ
7 การแก้ไขปัญหา
หัวข้อนี้จะกล่าวถึงปัญหาทั่วไปที่คุณอาจพบเจอ:
- ไม่มีไฟฟ้า: Ensure all power cables (24-pin ATX, 8-pin EPS, CPU fan) are securely connected. Check the power supply unit (PSU) and wall outlet.
- ไม่มีจอแสดงผล: Verify that the monitor is connected and powered on. Reseat the graphics card (if applicable) and memory modules. Try booting with only one memory module.
- เสียงเตือนจากระบบ: Beep codes often indicate specific hardware issues. Consult the Supermicro website or the motherboard's full manual for a list of beep codes and their meanings. Common issues include memory errors or graphics card problems.
- ระบบปฏิบัติการไม่บูต: Check the boot order in BIOS/UEFI. Ensure the storage drive with the operating system is detected and set as the primary boot device.
- ความไม่เสถียรของระบบ/การขัดข้อง: This can be caused by overheating, faulty memory, or outdated drivers. Monitor temperatures, run memory diagnostic tools, and update drivers.
8. ข้อมูลจำเพาะ
| คุณสมบัติ | ข้อมูลจำเพาะ |
|---|---|
| ชื่อรุ่น | X11SSZ-F-O |
| ฟอร์มแฟกเตอร์ | ไมโคร ATX |
| ซ็อคเก็ตซีพียู | แอลจีเอ 1151 |
| ชิปเซ็ต | อินเทล C236 |
| สล็อตหน่วยความจำ | 4x 288-pin DDR4 DIMM |
| ประเภทหน่วยความจำ | DDR4-2133/1866/1600 ECC/Non-ECC Unbuffered |
| ความจุหน่วยความจำสูงสุด | 64GB |
| สล็อต PCI-Express | 1x PCI-E 3.0 x16, 2x PCI-E 3.0 x8 (run at x4) |
| พอร์ต SATA | 4x SATA3 (6Gb/s) with RAID 0, 1, 5, 10 support |
| เสียง | Realtek ALC888S High Definition Audio CODEC |
| แลน | อีเธอร์เน็ตกิกะบิตคู่ |
| พอร์ต USB | Total 8 (includes 2x USB 2.0) |
| โปรเซสเซอร์ที่เข้ากันได้ | Intel Core i3/i5/i7 (6th/7th Gen), Xeon E3-1200 v5/v6 series |
9. การรับประกันและการสนับสนุน
Supermicro provides a limited warranty for its products. For detailed warranty terms and conditions, please refer to the warranty card included with your product or visit the official Supermicro website. For technical support, driver downloads, and further assistance, please visit the Supermicro support portal:
ฝ่ายสนับสนุน Supermicro Webเว็บไซต์
When contacting support, please have your motherboard model number (X11SSZ-F-O) and serial number ready.