
1. บทนำ
This manual provides detailed instructions for the installation, operation, maintenance, and troubleshooting of your Gateway SX2865 SFF Desktop Motherboard H61 (Model DB.U7411.001). This motherboard is designed for Small Form Factor (SFF) desktop systems, featuring the Intel H61 Express chipset and supporting LGA 1155/1156 CPUs and DDR3 RAM. Please read this manual thoroughly before proceeding with any installation or configuration to ensure proper functionality and safety.
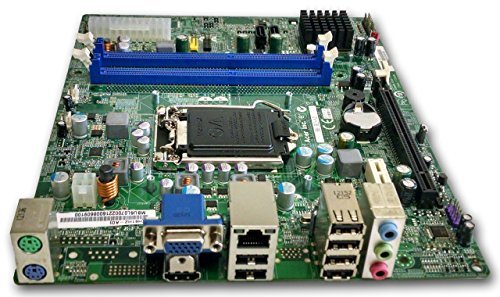
รูปที่ 1: เกินview of the Gateway SX2865 SFF Desktop Motherboard H61. This image displays the main components and layout of the motherboard, including the CPU socket, RAM slots, and various connectors.
2. ข้อมูลด้านความปลอดภัย
Always observe the following safety precautions when handling and installing computer components:
- ถอดสายไฟออกจากเต้ารับที่ผนังก่อนทำการติดตั้งหรือถอดอุปกรณ์ใดๆ
- สวมสายรัดข้อมือป้องกันไฟฟ้าสถิตย์เพื่อป้องกันความเสียหายจากการคายประจุไฟฟ้าสถิตย์ (ESD) ต่อส่วนประกอบที่มีความละเอียดอ่อน
- จับที่ขอบของเมนบอร์ดเพื่อหลีกเลี่ยงการสัมผัสชิ้นส่วนหรือวงจรที่บอบบาง
- ตรวจสอบให้แน่ใจว่ามีการระบายอากาศที่เหมาะสมภายในเคสคอมพิวเตอร์เพื่อป้องกันความร้อนสูงเกินไป
- อย่าให้เมนบอร์ดสัมผัสกับความชื้นหรืออุณหภูมิที่สูงหรือสูงเกินไป
- หากคุณไม่แน่ใจเกี่ยวกับขั้นตอนการติดตั้งใดๆ โปรดปรึกษาช่างเทคนิคที่มีคุณสมบัติเหมาะสม
3. การตั้งค่าและการติดตั้ง
Follow these steps to properly install the Gateway SX2865 SFF Desktop Motherboard into your system:
3.1. การเตรียมโครงตัวถัง
- Open your computer chassis and ensure it is clean and free of dust.
- Install the I/O shield provided with your chassis or motherboard into the rear panel opening.
- Verify that the standoffs in the chassis align with the mounting holes on the motherboard. Adjust if necessary.
3.2. การติดตั้งซีพียู
- Locate the CPU socket (LGA 1155/1156) on the motherboard.
- ยกคันโยกโหลดขึ้นเบาๆ และเปิดฝาครอบซ็อกเก็ต CPU
- Carefully align the CPU with the socket, matching the golden triangle on the CPU with the triangle mark on the socket. Do not force the CPU into the socket.
- ปิดฝาครอบซ็อกเก็ตและกดคันโยกโหลดลงจนกระทั่งล็อคเข้าที่
- Apply a thin layer of thermal paste to the CPU surface (if not pre-applied on the cooler).
- Install the CPU cooler according to its manufacturer's instructions, ensuring it is securely fastened.
3.3. การติดตั้ง RAM
- ค้นหาสล็อต DDR3 DIMM บนเมนบอร์ด
- เปิดคลิปที่ปลายทั้งสองด้านของช่อง DIMM
- จัดตำแหน่งรอยบากบนโมดูล RAM ให้ตรงกับร่องในช่องเสียบ DIMM
- กดลงบนปลายทั้งสองด้านของโมดูล RAM ให้แน่นจนกระทั่งคลิปล็อกเข้าที่
3.4. การติดตั้งเมนบอร์ด
- Carefully place the motherboard into the chassis, aligning the mounting holes with the standoffs.
- ยึดเมนบอร์ดด้วยสกรู โดยระวังอย่าขันแน่นเกินไป
3.5. การเชื่อมต่ออุปกรณ์ต่อพ่วงและพลังงาน
- เชื่อมต่อขั้วต่อไฟ ATX 24 พิน และขั้วต่อไฟ CPU 4 พิน จากพาวเวอร์ซัพพลายเข้ากับเมนบอร์ด
- เชื่อมต่อสายเคเบิลข้อมูล SATA จากอุปกรณ์จัดเก็บข้อมูล (HDD/SSD) เข้ากับพอร์ต SATA บนเมนบอร์ด
- Connect front panel connectors (power button, reset button, USB, audio) to their respective headers on the motherboard. Refer to the motherboard's silkscreen labels for correct orientation.
- Install any expansion cards (e.g., graphics card) into the appropriate PCIe slots and secure them.
- Connect all necessary cables to your power supply.
4. การใช้งานและการกำหนดค่า
4.1. การบูตเครื่องครั้งแรก
- After all components are installed and connected, close the chassis.
- เชื่อมต่อจอภาพ คีย์บอร์ด และเมาส์ของคุณ
- Connect the power cord to the power supply and a wall outlet.
- กดปุ่มเปิดปิดบนคอมพิวเตอร์ของคุณ
4.2. การตั้งค่า BIOS/UEFI
The BIOS (Basic Input/Output System) or UEFI (Unified Extensible Firmware Interface) is firmware that initializes hardware during the booting process. To enter the BIOS/UEFI setup utility:
- During the initial boot-up sequence, repeatedly press the designated key (commonly เดล, F2, หรือ เอฟ10). The exact key may vary; check the on-screen prompts.
- Within the BIOS/UEFI, you can configure settings such as:
- วันที่และเวลาของระบบ
- Boot Order (to install an operating system from a USB drive or DVD)
- SATA Mode (AHCI, IDE)
- CPU and Memory settings (advanced users)
- บันทึกการเปลี่ยนแปลงและออกจาก BIOS/UEFI เพื่อดำเนินการบูตต่อไป
4.3. การติดตั้งระบบปฏิบัติการและไดรเวอร์
After configuring the BIOS/UEFI, proceed with installing your preferred operating system (e.g., Windows, Linux). Once the OS is installed, install the necessary drivers for the motherboard's components (chipset, audio, LAN, etc.). These drivers are typically available on the manufacturer's website (Acer/Gateway) or can be found through the operating system's update features.
5. การบำรุงรักษา
Regular maintenance helps ensure the longevity and stable performance of your motherboard:
- การกำจัดฝุ่น: Periodically clean the inside of your computer case, including the motherboard, CPU cooler, and fan vents, using compressed air. Ensure the system is powered off and unplugged before cleaning.
- อัปเดต BIOS: ตรวจสอบของผู้ผลิต website (Acer/Gateway) for BIOS/UEFI updates. Updates can improve stability, add support for new hardware, or fix bugs. Follow the update instructions carefully to avoid damaging the motherboard.
- การอัปเดตไดรเวอร์: Keep your system drivers updated to ensure optimal performance and compatibility.
- การตรวจร่างกาย: ควรตรวจสอบเมนบอร์ดเป็นระยะๆ เพื่อดูว่ามีร่องรอยความเสียหาย การเชื่อมต่อหลวม หรือตัวเก็บประจุบวมหรือไม่
6 การแก้ไขปัญหา
หากคุณพบปัญหาเกี่ยวกับเมนบอร์ด โปรดดูขั้นตอนการแก้ไขปัญหาทั่วไปต่อไปนี้:
- ไม่มีไฟฟ้า:
- Ensure the power supply is connected correctly to the motherboard (24-pin ATX and 4-pin CPU).
- Check that the power supply switch is in the 'ON' position.
- Verify the power cord is securely plugged into both the power supply and the wall outlet.
- Confirm the front panel power button connector is correctly attached to the motherboard.
- ไม่มีจอแสดงผล:
- Ensure the monitor is powered on and connected to the correct video output (either integrated graphics or a dedicated graphics card).
- ลองถอดและเสียบโมดูล RAM ใหม่ ลองบูตเครื่องโดยเสียบ RAM เพียงโมดูลเดียวดู
- ถอดและเสียบการ์ดจอใหม่ (ถ้ามี)
- Check if the CPU cooler is properly installed and the CPU power connector is secure.
- System Fails to Boot / POST Errors:
- Listen for beep codes from the motherboard's speaker (if installed). Consult the motherboard's documentation for beep code meanings.
- Clear the CMOS (Complementary Metal-Oxide-Semiconductor) by removing the CMOS battery for a few minutes or using the clear CMOS jumper (refer to motherboard layout).
- Ensure all essential components (CPU, RAM, GPU) are correctly installed.
- ปัญหาเกี่ยวกับระบบปฏิบัติการ:
- Verify that all necessary drivers are installed and up to date.
- Check SATA cable connections for storage devices.
- Run diagnostic tools for hard drives/SSDs and RAM.
7. ข้อมูลจำเพาะ
Key technical specifications for the Gateway SX2865 SFF Desktop Motherboard H61 (Model DB.U7411.001):
| คุณสมบัติ | รายละเอียด |
|---|---|
| ยี่ห้อ | เกตเวย์ |
| ชื่อรุ่น | SX2865 |
| หมายเลขรุ่นสินค้า | DB.U7411.001 |
| ผู้ผลิต | Acer |
| ประเภทชิปเซ็ต | อินเทล H61 เอ็กซ์เพรส |
| ซ็อคเก็ตซีพียู | LGA 1155 or LGA 1156 |
| โปรเซสเซอร์ที่เข้ากันได้ | Intel Xeon (and other compatible LGA 1155/1156 CPUs) |
| เทคโนโลยีหน่วยความจำ RAM | DDR3 |
| ความเร็วสัญญาณนาฬิกาหน่วยความจำ | 2133 MHz (Max supported, actual speed depends on CPU and RAM) |
| ความจุของหน่วยความจำ | 16 GB (Maximum supported) |
| อุปกรณ์ที่รองรับ | เครื่องคอมพิวเตอร์ส่วนบุคคล |
| แพลตฟอร์ม | Linux (and other compatible operating systems) |
| ฟอร์มแฟกเตอร์ | uATX (Micro-ATX) |
8. การรับประกันและการสนับสนุน
For warranty information and technical support regarding your Gateway SX2865 SFF Desktop Motherboard H61 (Model DB.U7411.001), please refer to the documentation provided with your original system or contact the manufacturer directly.
- ผู้ผลิต: Acer (as per product specifications)
- ยี่ห้อ: เกตเวย์
- เยี่ยมชมอย่างเป็นทางการ รองรับเกตเวย์ webเว็บไซต์ or ฝ่ายสนับสนุนของเอเซอร์ webเว็บไซต์ for drivers, FAQs, and contact information.
- เก็บหลักฐานการซื้อของคุณไว้เพื่อเรียกร้องการรับประกัน