
1. ข้อมูลด้านความปลอดภัย
โปรดอ่านและทำความเข้าใจคำเตือนด้านความปลอดภัย คำแนะนำ ภาพประกอบ และข้อมูลจำเพาะทั้งหมดที่มาพร้อมกับเครื่องมือไฟฟ้านี้เสมอ การไม่ปฏิบัติตามคำแนะนำทั้งหมดที่ระบุไว้ด้านล่างอาจส่งผลให้เกิดไฟฟ้าช็อต ไฟไหม้ และ/หรือบาดเจ็บสาหัสได้
- ความปลอดภัยในพื้นที่ทำงาน: รักษาพื้นที่ทำงานให้สะอาดและมีแสงสว่างเพียงพอ พื้นที่ที่รกหรือมืดอาจเกิดอุบัติเหตุได้
- ความปลอดภัยส่วนบุคคล: Always wear eye protection, hearing protection, and appropriate gloves. Do not overreach. Maintain proper footing and balance at all times.
- การใช้และการดูแลเครื่องมือ: อย่าฝืนใช้เครื่องมือไฟฟ้า ใช้เครื่องมือไฟฟ้าที่เหมาะสมกับงานของคุณ ถอดปลั๊กออกจากแหล่งจ่ายไฟและ/หรือถอดชุดแบตเตอรี่ (หากถอดได้) ออกจากเครื่องมือไฟฟ้าก่อนทำการปรับแต่ง เปลี่ยนอุปกรณ์เสริม หรือจัดเก็บเครื่องมือไฟฟ้า
- ความปลอดภัยในการจ่ายอากาศ: Ensure the air supply is clean, dry, and regulated to the specified pressure. Never exceed the maximum operating pressure.
- Noise Exposure: Prolonged exposure to high noise levels can cause hearing damage. Use hearing protection.
- การได้รับแรงสั่นสะเทือน: Excessive vibration can cause hand-arm vibration syndrome. Take breaks and use anti-vibration gloves if necessary.
2. สินค้าหมดview
The Bahco BPM914L is a compact and powerful 1/2-inch mini impact wrench designed for various fastening and loosening applications. Its long anvil design provides extended reach for difficult-to-access fasteners.
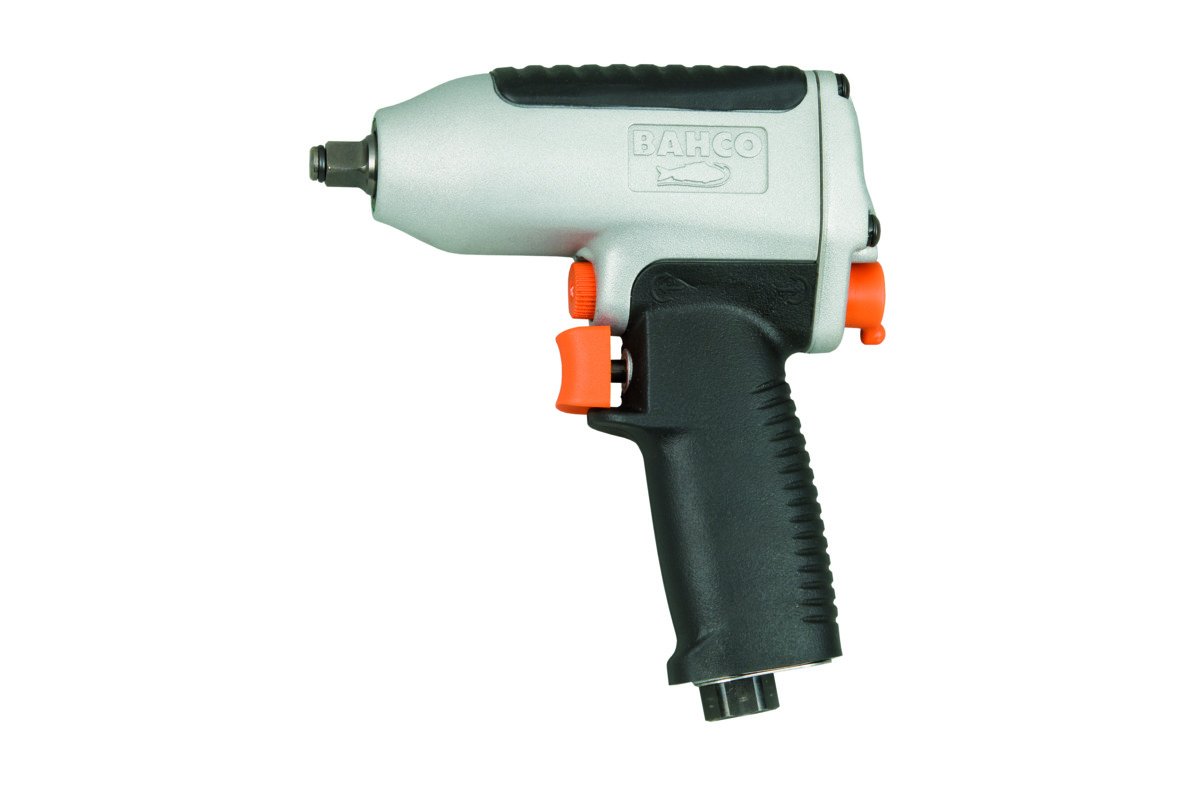
รูปที่ 1: Bahco BPM914L 1/2" Mini Impact Wrench. This image shows the compact body, the 1/2-inch square drive with a long anvil, and the ergonomic handle of the impact wrench.
ส่วนประกอบ:
- หัวขับสี่เหลี่ยมขนาด 1/2 นิ้ว: For attaching impact sockets.
- Long Anvil: Provides extended reach.
- สิ่งกระตุ้น: เปิดใช้งานเครื่องมือ
- ตัวเลือกเดินหน้า/ถอยหลัง: เปลี่ยนทิศทางการหมุน
- อากาศไหลเข้า: Connection point for air hose.
- พอร์ตไอเสีย: Directs air away from the user.
3. การตั้งค่า
- การเชื่อมต่อระบบจ่ายอากาศ:
- ตรวจสอบให้แน่ใจว่าเครื่องอัดอากาศของคุณสามารถจ่ายแรงดันและปริมาณอากาศได้ตามต้องการ (โปรดดูข้อมูลจำเพาะ)
- Connect a suitable air hose (minimum 3/8" I.D.) to the tool's air inlet. Use thread sealant on fittings.
- Install an in-line air filter/lubricator as close to the tool as possible to ensure clean, lubricated air.
- Set the air pressure regulator on your compressor to the recommended operating pressure (typically 90 PSI / 6.2 bar).
- อุปกรณ์ต่อซ็อกเก็ต:
- Select the appropriate 1/2" drive impact-grade socket for your fastener.
- Push the socket firmly onto the square drive anvil until it locks securely.
- Always use impact-grade sockets; standard chrome sockets can shatter.
- การตรวจสอบเบื้องต้น: Before use, ensure all connections are secure and there are no air leaks.
4. คู่มือการใช้งาน
- การเลือกทิศทาง:
- Locate the forward/reverse selector switch.
- Move the switch to the "F" position for tightening (forward rotation) or "R" for loosening (reverse rotation).
- Ensure the selector is fully engaged in the desired position before operating.
- การนำเครื่องมือไปใช้:
- วางซ็อกเก็ตลงบนตัวยึดให้ตรงสนิท
- Hold the tool firmly with both hands if possible, maintaining good balance.
- การเปิดใช้งานเครื่องมือ:
- Press the trigger to start the tool. The impact mechanism will engage automatically.
- Apply steady pressure to the tool, keeping it aligned with the fastener.
- ปล่อยไกปืนเพื่อหยุดเครื่องมือ
- Torque Control (if applicable): This model may have limited or no external torque adjustment. For critical torque applications, always use a calibrated torque wrench for final tightening.
5. การบำรุงรักษา
การบำรุงรักษาอย่างสม่ำเสมอจะช่วยให้ประแจกระแทกทำงานได้อย่างมีประสิทธิภาพสูงสุดและยืดอายุการใช้งาน
- การหล่อลื่น: Ensure the in-line lubricator is filled with appropriate pneumatic tool oil. If no lubricator is used, add a few drops of pneumatic tool oil into the air inlet before each use.
- การทำความสะอาด: Keep the tool clean and free from debris. Wipe down the exterior with a clean cloth. Do not use harsh solvents.
- ตัวกรองอากาศ: ตรวจสอบและทำความสะอาดหรือเปลี่ยนแผ่นกรองอากาศในระบบจ่ายอากาศของคุณเป็นประจำ เพื่อป้องกันสิ่งปนเปื้อนเข้าสู่เครื่องมือ
- Anvil and Retainer: Inspect the anvil and socket retainer for wear or damage. Replace if necessary.
- พื้นที่จัดเก็บ: Store the tool in a dry, clean environment when not in use. Disconnect from the air supply.
6 การแก้ไขปัญหา
| ปัญหา | สาเหตุที่เป็นไปได้ | สารละลาย |
|---|---|---|
| เครื่องมือไม่ทำงานหรือกำลังไฟต่ำ |
|
|
| Air leaking from tool. |
|
|
| Tool not impacting. |
|
|
7. ข้อมูลจำเพาะ
| ข้อมูลจำเพาะ | ค่า |
|---|---|
| ผู้ผลิต | บาห์โก้ |
| หมายเลขชิ้นส่วน | BPM914L |
| หมายเลขรุ่นสินค้า | BPM914L |
| น้ำหนักสินค้า | 3.43 ปอนด์ |
| ขนาดสินค้า | 7.87 x 2.36 x 6.69 นิ้ว |
| รายการ จำนวนแพ็คเกจ | 1 |
| รวมแบตเตอรี่ | เลขที่ |
| แบตเตอรี่ที่จำเป็น | เลขที่ |
| ASIN | B00TT1MFCM |
| วันที่พร้อมใช้งานครั้งแรก | วันที่ 16 ธันวาคม 2023 |
8. การรับประกันและการสนับสนุน
For warranty information or technical support, please refer to the documentation included with your purchase or visit the official Bahco webไซต์นี้ โปรดเก็บหลักฐานการซื้อไว้เพื่อใช้ยืนยันการรับประกัน
Bahco Official Webเว็บไซต์: www.bahco.com