
การแนะนำ
This manual provides essential instructions for the safe and effective use, assembly, operation, maintenance, and troubleshooting of your Mintcraft SX-8B 2 Gallon Polyethylene Compression Sprayer. Please read this manual thoroughly before operating the sprayer and retain it for future reference.
The Mintcraft SX-8B is a general-purpose pressure sprayer designed for applying water, fertilizers, herbicides, and pesticides. It features a non-corrosive polyethylene construction, a heavy-duty hose, and a sprayer wand with an adjustable nozzle and on/off trigger lock.
ข้อมูลด้านความปลอดภัยที่สำคัญ
คำเตือน: การไม่ปฏิบัติตามคำแนะนำด้านความปลอดภัยเหล่านี้อาจส่งผลให้เกิดการบาดเจ็บร้ายแรงหรือความเสียหายต่อทรัพย์สิน
- ควรสวมใส่อุปกรณ์ป้องกันส่วนบุคคล (PPE) ที่เหมาะสม เช่น ถุงมือ แว่นตาป้องกัน และหน้ากากอนามัย ทุกครั้งเมื่อต้องจัดการกับสารเคมี
- Never use flammable liquids, hot liquids, or caustic chemicals in this sprayer.
- Do not over-pressurize the sprayer. Follow the recommended pressure levels.
- เก็บเครื่องพ่นให้พ้นมือเด็กและสัตว์เลี้ยง
- คลายแรงดันออกจากเครื่องพ่นสารเคมีหลังการใช้งานทุกครั้ง และก่อนการจัดเก็บหรือการบำรุงรักษา
- Ensure all connections are tight before pressurizing.
- Do not leave the sprayer unattended while pressurized.
- Dispose of chemical residues according to local regulations.
รายการชิ้นส่วน
Familiarize yourself with the components of your sprayer:
- Sprayer Tank (2 Gallon Polyethylene)
- Pump Assembly (with handle)
- วาล์วระบายแรงดัน
- สายยาง
- ไม้กายสิทธิ์เครื่องพ่นสารเคมี
- หัวฉีดปรับได้
- ล็อคทริกเกอร์
- Shoulder Strap (if included)
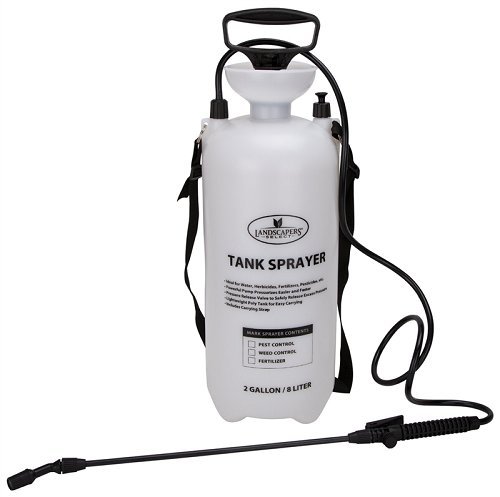
Image: The Mintcraft SX-8B 2 Gallon Polyethylene Compression Sprayer, showing the main tank, pump handle, hose, and wand assembly.
การติดตั้งและการประกอบ
- แกะส่วนประกอบ: นำชิ้นส่วนทั้งหมดออกจากบรรจุภัณฑ์อย่างระมัดระวัง ตรวจสอบความเสียหายที่อาจเกิดขึ้น
- ติดท่อ: Securely connect the hose to the sprayer tank outlet and the sprayer wand inlet. Ensure connections are hand-tight to prevent leaks.
- ติดสายสะพายไหล่ (ไม่จำเป็น): If a shoulder strap is provided, attach it to the designated loops on the sprayer tank for easier carrying.
- เตรียมโซลูชั่น: Before filling, ensure your desired liquid solution is properly mixed according to its manufacturer's instructions.
- เติมถัง: Unscrew the pump assembly from the tank. Carefully pour the prepared solution into the tank, ensuring not to exceed the maximum fill line. Do not fill above the shoulder of the tank.
- การประกอบปั๊มให้แน่น: Reinsert the pump assembly into the tank opening and screw it down tightly to create a secure seal.
คำแนะนำการใช้งาน
- เพิ่มแรงดันให้กับเครื่องพ่นยา: With the pump assembly securely tightened, pump the handle up and down approximately 10-20 times until resistance is felt. This builds pressure inside the tank. Do not over-pump.
- ปรับหัวฉีด: Twist the adjustable nozzle at the end of the wand to achieve the desired spray pattern (from a fine mist to a solid stream).
- เริ่มการพ่น: Point the wand towards the target area. Squeeze the trigger on the wand to begin spraying.
- Use Trigger Lock: For continuous spraying, push the trigger lock forward while the trigger is depressed. To stop, release the trigger lock and then the trigger.
- รักษาแรงดันไว้: If the spray weakens, pump the handle a few more times to restore pressure.
- คลายแรงดันหลังการใช้งาน: Once spraying is complete, เสมอ release the pressure from the tank. To do this, pull the pressure release valve (usually a small knob or lever on the pump assembly) until all air has escaped. You will hear a hissing sound.
การซ่อมบำรุง
- การทำความสะอาดหลังการใช้งานแต่ละครั้ง:
- เทสารละลายที่เหลืออยู่ในถังออกให้หมด
- ล้างถังให้สะอาดด้วยน้ำสะอาด
- Fill the tank with clean water, pressurize, and spray through the wand until the tank is empty to flush the hose and nozzle.
- Release all pressure and allow all components to air dry before storage.
- การทำความสะอาดหัวฉีด: If the nozzle becomes clogged, unscrew it from the wand and clean it with a small brush or by rinsing under strong water pressure. Do not use metal objects that could damage the nozzle.
- การหล่อลื่นซีล: Periodically inspect the O-rings and seals on the pump assembly and wand. If they appear dry or cracked, apply a small amount of silicone grease to maintain a good seal and prevent leaks.
- พื้นที่จัดเก็บ: เก็บเครื่องพ่นยาไว้ในที่แห้งและเย็น หลีกเลี่ยงแสงแดดโดยตรงและอุณหภูมิที่ต่ำกว่าจุดเยือกแข็ง ตรวจสอบให้แน่ใจว่าได้ปล่อยแรงดันทั้งหมดออกก่อนจัดเก็บ
การแก้ไขปัญหา
| ปัญหา | สาเหตุที่เป็นไปได้ | สารละลาย |
|---|---|---|
| Sprayer does not build pressure. | Loose pump assembly; Worn O-rings/seals; Clogged check valve. | Tighten pump assembly; Inspect and lubricate/replace O-rings; Clean check valve. |
| Liquid leaks from connections. | การเชื่อมต่อหลวม; โอริง/ซีลเสียหาย | ขันข้อต่อทั้งหมดให้แน่น ตรวจสอบและเปลี่ยนโอริง/ซีลที่ชำรุด |
| ไม่มีสเปรย์หรือมีสเปรย์อ่อนมาก | Insufficient pressure; Clogged nozzle or wand; Empty tank. | Pump more to build pressure; Clean nozzle/wand; Refill tank. |
| Pressure releases too quickly. | Loose pump assembly; Faulty pressure release valve; Damaged tank. | Tighten pump assembly; Inspect pressure release valve for debris; Check tank for cracks. |
ข้อมูลจำเพาะ
- แบบอย่าง: SX-8B
- ความจุ: 2 แกลลอน
- วัสดุ: Polyethylene (non-corrosive)
- ขนาดสินค้า : 14.96 x 22.65 x 22.24 นิ้ว
- น้ำหนักสินค้า: 3.19 ปอนด์
- ผู้ผลิต: ORGILL WWS-L&G (Brand: Mintcraft)
- คุณสมบัติ: Adjustable nozzle, on/off trigger lock, heavy-duty hose.
การรับประกันและการสนับสนุน
For warranty information or technical support, please refer to the documentation provided with your purchase or contact Mintcraft customer service. Keep your purchase receipt as proof of purchase.
Note: Specific warranty terms may vary. Please consult the official Mintcraft webโปรดตรวจสอบเว็บไซต์หรือผู้ค้าปลีกของคุณเพื่อรับข้อมูลล่าสุด