
1. บทนำ
The D-Link DSL-G225 Wireless N300 ADSL2+/VDSL2 Modem Router is designed to provide a reliable and secure internet connection for home and office environments. This device supports various internet connection types, including ADSL2+, VDSL2, NBN (Australia), and UFB (New Zealand), ensuring broad compatibility with different service providers.
Equipped with N300 Wi-Fi technology and four Ethernet LAN ports, the DSL-G225 allows for seamless sharing of your internet connection across multiple devices such as desktop computers, laptops, tablets, smartphones, gaming consoles, and smart TVs.
คุณสมบัติที่สำคัญ ได้แก่:
- Integrated ADSL2+/VDSL2 Modem for direct line connection.
- Wireless N300 technology for fast Wi-Fi speeds.
- Four 10/100 Ethernet LAN ports for wired connections.
- Support for NBN (Australia) and UFB (New Zealand) connection options.
- Easy setup wizard for quick installation.
2. ฮาร์ดแวร์โอเวอร์view
2.1 แผงด้านหน้า
The front panel of the DSL-G225 features a series of LED indicators that provide real-time status information about the device's operation.
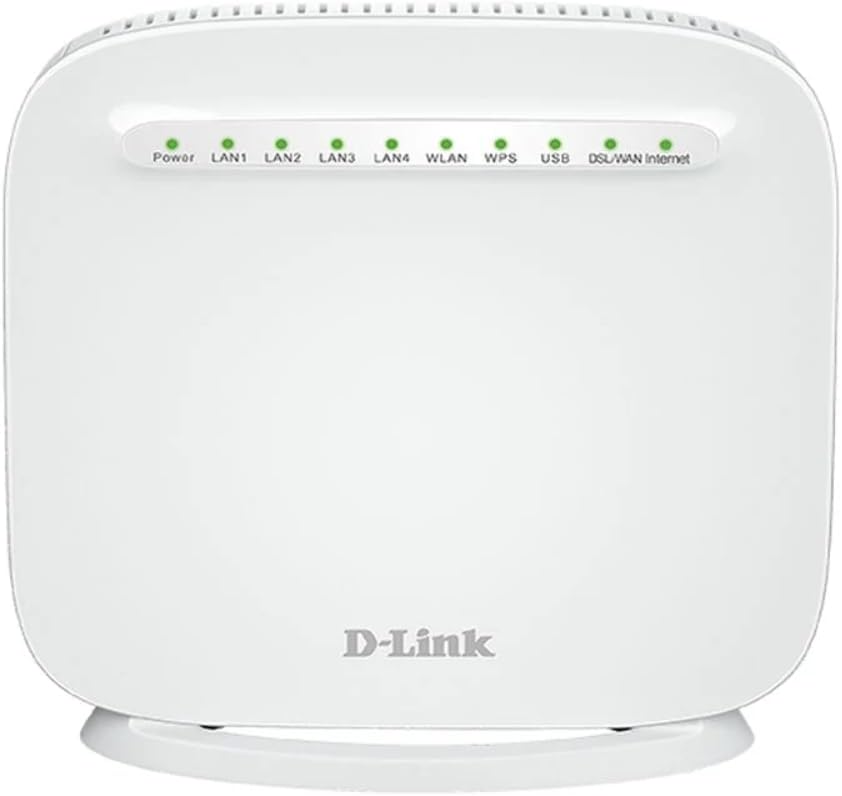
รูปที่ 1: ด้านหน้า view of the D-Link DSL-G225 Modem Router, showing the Power, LAN, WLAN, WPS, USB, DSL/WAN, and Internet LED indicators.
| ไฟ LED แสดงสถานะ | สถานะ | คำอธิบาย |
|---|---|---|
| พลัง | สีเขียวทึบ | อุปกรณ์เปิดอยู่ |
| แลน 1-4 | สีเขียวทึบ | อุปกรณ์ชิ้นหนึ่งถูกเชื่อมต่อเข้ากับพอร์ต LAN ที่เกี่ยวข้อง |
| ไฟกระพริบสีเขียว | มีการส่งหรือรับข้อมูลผ่านพอร์ต LAN ที่เกี่ยวข้อง | |
| ไว-แลน | สีเขียวทึบ | Wireless functionality is enabled. |
| ไฟกระพริบสีเขียว | Wireless data is being transmitted or received. | |
| ดับบลิวพีเอส | ไฟกระพริบสีเขียว | WPS connection attempt in progress. |
| ยูเอสบี | สีเขียวทึบ | A USB device is connected and recognized. |
| DSL/WAN | สีเขียวทึบ | DSL line is connected and synchronized, or WAN port is active. |
| ไฟกระพริบสีเขียว | Attempting to establish DSL synchronization or WAN connection. | |
| อินเทอร์เน็ต | สีเขียวทึบ | Successfully connected to the internet. |
| ไฟกระพริบสีเขียว | Data is being transmitted or received over the internet. |
2.2 แผงด้านหลัง
The rear panel contains all the physical ports for connecting the modem router to your internet service and local network devices.
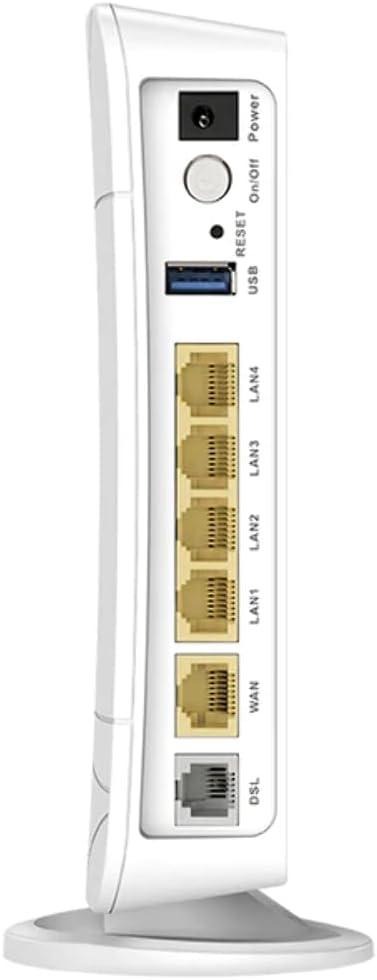
รูปที่ 2: หลัง view of the D-Link DSL-G225 Modem Router, displaying the Power input, On/Off button, Reset button, USB port, LAN ports, WAN port, and DSL port.
| พอร์ต/ปุ่ม | คำอธิบาย |
|---|---|
| กำลังไฟเข้า | เชื่อมต่อกับอะแดปเตอร์ไฟฟ้าที่ให้มา |
| ปุ่มเปิด/ปิด | เปิดหรือปิดอุปกรณ์ |
| ปุ่มรีเซ็ต | กดค้างไว้ 10 วินาที เพื่อคืนการตั้งค่าเริ่มต้นจากโรงงาน |
| พอร์ต USB | Connects USB devices such as storage drives for network sharing. |
| พอร์ตแลน 1-4 | Connects wired devices (e.g., computers, gaming consoles) using Ethernet cables. |
| พอร์ต WAN | Connects to an external modem or NBN/UFB Network Termination Device (NTD) for internet access. |
| พอร์ต DSL | Connects to the telephone line for ADSL2+/VDSL2 internet service. |
3. การตั้งค่า
3.1 การเชื่อมต่อทางกายภาพ
- การเชื่อมต่อไฟฟ้า: Connect the provided power adapter to the Power Input port on the rear panel of the modem router and then plug it into a power outlet. Press the On/Off button. The Power LED on the front panel should illuminate green.
- การเชื่อมต่ออินเตอร์เน็ต:
- For ADSL2+/VDSL2: Connect a telephone cable from your wall socket to the ดีเอสแอล พอร์ตบนเราเตอร์โมเด็ม
- For NBN/UFB (FTTP/FTTC/HFC/Fixed Wireless): Connect an Ethernet cable from your NBN/UFB Network Termination Device (NTD) or wall socket to the วัน พอร์ตบนเราเตอร์โมเด็ม
- Local Network Connection (Optional): เชื่อมต่อสายเคเบิลอีเทอร์เน็ตจากหนึ่งใน แลน 1-4 ports on the modem router to your computer's Ethernet port. For wireless devices, proceed to the Wi-Fi connection steps.
3.2 การกำหนดค่าเริ่มต้น
After physical connections are made, you can configure the modem router using its webอินเทอร์เฟซแบบอิง
- Ensure your computer is connected to the modem router via Ethernet or Wi-Fi.
- เปิด web เบราว์เซอร์ (เช่น Chrome, Firefox, Edge)
- ในแถบที่อยู่พิมพ์
http://192.168.1.1(default IP address) and press Enter. - ป้อนชื่อผู้ใช้และรหัสผ่านเริ่มต้น (โดยปกติ)
adminfor both, or as printed on a label on the device). - Follow the on-screen Setup Wizard to configure your internet connection settings (ISP username/password, connection type) and Wi-Fi network name (SSID) and password.
4. ปฏิบัติการ
4.1 การเชื่อมต่ออุปกรณ์ผ่าน Wi-Fi
- On your wireless device (smartphone, tablet, laptop), open the Wi-Fi settings.
- สแกนหาเครือข่ายที่มีอยู่
- Select your Wi-Fi network name (SSID) as configured during the setup process.
- Enter your Wi-Fi password (network key) when prompted.
- Your device should now be connected to the internet via Wi-Fi.
4.2 การเชื่อมต่ออุปกรณ์ผ่านสายอีเธอร์เน็ต
For devices requiring a stable wired connection, use an Ethernet cable.
- Connect one end of an Ethernet cable to an available แลน port (1-4) on the rear of the modem router.
- Connect the other end of the Ethernet cable to the Ethernet port on your device (e.g., computer, smart TV, gaming console).
- The corresponding LAN LED on the front panel should illuminate green, indicating a successful connection.
4.3 ฟังก์ชันการทำงานของพอร์ต USB
The USB port on the DSL-G225 can be used to connect a USB storage device (e.g., a USB flash drive or external hard drive) to share files across your network. Refer to the modem router's web interface for specific settings related to USB storage sharing.
5. การบำรุงรักษา
การอัปเดตเฟิร์มแวร์ 5.1 รายการ
Periodically check the D-Link Australia support website for firmware updates. Firmware updates can improve performance, add new features, and address security vulnerabilities. Follow the instructions provided on the D-Link webโปรดระมัดระวังเป็นอย่างยิ่งเมื่อทำการอัปเดตเฟิร์มแวร์
5.2 รีเซ็ตเป็นค่าโรงงาน
หากคุณพบปัญหาอย่างต่อเนื่องหรือลืมข้อมูลการเข้าสู่ระบบ คุณสามารถทำการรีเซ็ตเป็นค่าเริ่มต้นจากโรงงานได้ การดำเนินการนี้จะคืนค่าการตั้งค่าทั้งหมดกลับไปเป็นค่าเริ่มต้น
- With the modem router powered on, locate the รีเซ็ต ปุ่มบนแผงด้านหลัง
- Using a paperclip or a similar pointed object, press and hold the Reset button for approximately 10 seconds.
- Release the button. The modem router will restart with factory default settings. You will need to reconfigure your internet and Wi-Fi settings.
6 การแก้ไขปัญหา
6.1 ไม่มีการเชื่อมต่ออินเทอร์เน็ต
- ตรวจสอบสายเคเบิล: Ensure all cables (power, DSL/WAN, Ethernet) are securely connected.
- สถานะ LED: ตรวจสอบความถูกต้อง พลัง, DSL/WAN, และ อินเทอร์เน็ต LEDs are solid green. If the DSL/WAN LED is flashing, there might be an issue with your internet line or connection type. If the Internet LED is off, check your ISP settings in the router's web อินเทอร์เฟซ
- ข้อมูลประจำตัวผู้ให้บริการอินเทอร์เน็ต (ISP): Confirm that your internet service provider (ISP) username and password are correctly entered in the modem router's configuration.
- รีสตาร์ทอุปกรณ์: Power cycle the modem router and any connected devices (computer, NBN/UFB NTD) by unplugging them for 30 seconds and then plugging them back in.
6.2 ปัญหาการเชื่อมต่อ Wi-Fi
- ไฟ LED แบบไร้สาย: ให้แน่ใจว่า ไว-แลน LED on the front panel is solid green. If it's off, Wi-Fi might be disabled. Check settings in the web อินเทอร์เฟซ
- รหัสผ่านที่ถูกต้อง: Verify you are entering the correct Wi-Fi password (network key).
- ความแรงของสัญญาณ: Move closer to the modem router to check if signal strength is an issue. Obstacles like walls and large appliances can interfere with Wi-Fi signals.
- การรบกวนช่องสัญญาณ: In congested areas, changing the Wi-Fi channel in the router's settings may improve performance.
6.3 ความเร็วอินเทอร์เน็ตช้า
- จำนวนอุปกรณ์: Too many devices actively using the network can reduce speeds.
- การรบกวน: Other wireless devices (cordless phones, microwaves) can cause interference.
- เฟิร์มแวร์: Ensure your modem router has the latest firmware installed.
- ปัญหา ISP: Contact your internet service provider to check for any network issues in your area or with your service plan.
7. ข้อมูลจำเพาะ
| คุณสมบัติ | รายละเอียด |
|---|---|
| หมายเลขรุ่น | DSL-G225-AU |
| ยี่ห้อ | ดีลิงค์ |
| ชุด | ไร้สาย N300 |
| ประเภทไร้สาย | 802.11n |
| ระดับย่านความถี่ | แบนด์เดียว |
| พอร์ตอีเทอร์เน็ต | 4 x 10/100 LAN ports, 1 x WAN port |
| พอร์ต USB | พอร์ต USB 1 2.0 พอร์ต |
| ประเภทโมเด็ม | ADSL2+/VDSL2 |
| ระบบปฏิบัติการ | RouterOS (D-Link Firmware) |
| คุณสมบัติพิเศษ | โหมดจุดเข้าใช้งาน |
| ขนาด (กว้าง x ยาว x สูง) | 15.5 x 15 x 6 ซม. |
| น้ำหนักสินค้า | 590 กรัม |
| ผู้ผลิต | D-Link Australia |
8. การรับประกันและการสนับสนุน
For warranty information and technical support, please refer to the official D-Link Australia website or contact D-Link customer service. Warranty terms and conditions may vary by region and purchase date.
It is recommended to register your product on the D-Link website to receive updates and access support resources.