
1. บทนำ
ขอบคุณสำหรับการซื้อasing the Mastech MS8230B Digital Multimeter. This device is a compact, battery-operated, handheld digital multimeter designed for measuring DC and AC voltage, DC current, resistance, diode, and transistor (hFE) tests. It features a large LCD display for easy reading and is built to international safety standards.
Please read this instruction manual thoroughly before using the multimeter to ensure safe and proper operation. Keep this manual for future reference.
2. ข้อมูลด้านความปลอดภัย
This multimeter is designed according to IEC 1010-1 international safety standards for electronic measuring instruments. It complies with CAT III 600V and CAT II 1000V overvoltage categories. Always adhere to the following safety precautions:
- ห้ามป้อนค่าเกินขีดจำกัดสูงสุดสำหรับฟังก์ชันใดๆ เด็ดขาด
- Do not use the meter if the case is damaged or open.
- Ensure the test leads are in good condition, without any damaged insulation.
- ควรปิดสวิตช์ไฟและปล่อยประจุไฟฟ้าแรงสูงทั้งหมดก่อนเสมอtage capacitors before measuring resistance, diodes, or hFE.
- ใช้ความระมัดระวังอย่างยิ่งเมื่อทำงานกับโวลุ่มtagสูงกว่า 60V DC หรือ 30V AC RMS เนื่องจากอาจเกิดอันตรายจากไฟฟ้าช็อตได้
- ถอดสายทดสอบออกจากวงจรก่อนเปลี่ยนฟังก์ชันหรือช่วงการวัด
- ควรเปลี่ยนแบตเตอรี่ทันทีเมื่อไฟแสดงสถานะแบตเตอรี่ต่ำปรากฏขึ้น เพื่อให้ได้ค่าการวัดที่แม่นยำ
- ห้ามใช้งานมิเตอร์ในบริเวณที่มีก๊าซ ไอระเหย หรือฝุ่นละอองที่อาจก่อให้เกิดการระเบิดได้
3. เนื้อหาบรรจุภัณฑ์
โปรดตรวจสอบว่าสิ่งของทั้งหมดที่ระบุไว้ด้านล่างครบถ้วนและไม่เสียหาย:
- Mastech MS8230B Digital Multimeter
- สายทดสอบ (หนึ่งคู่)
- แบตเตอรี่ 9V (ติดตั้งมาแล้ว หรือมีจำหน่ายแยกต่างหาก)
- คู่มือการใช้งาน
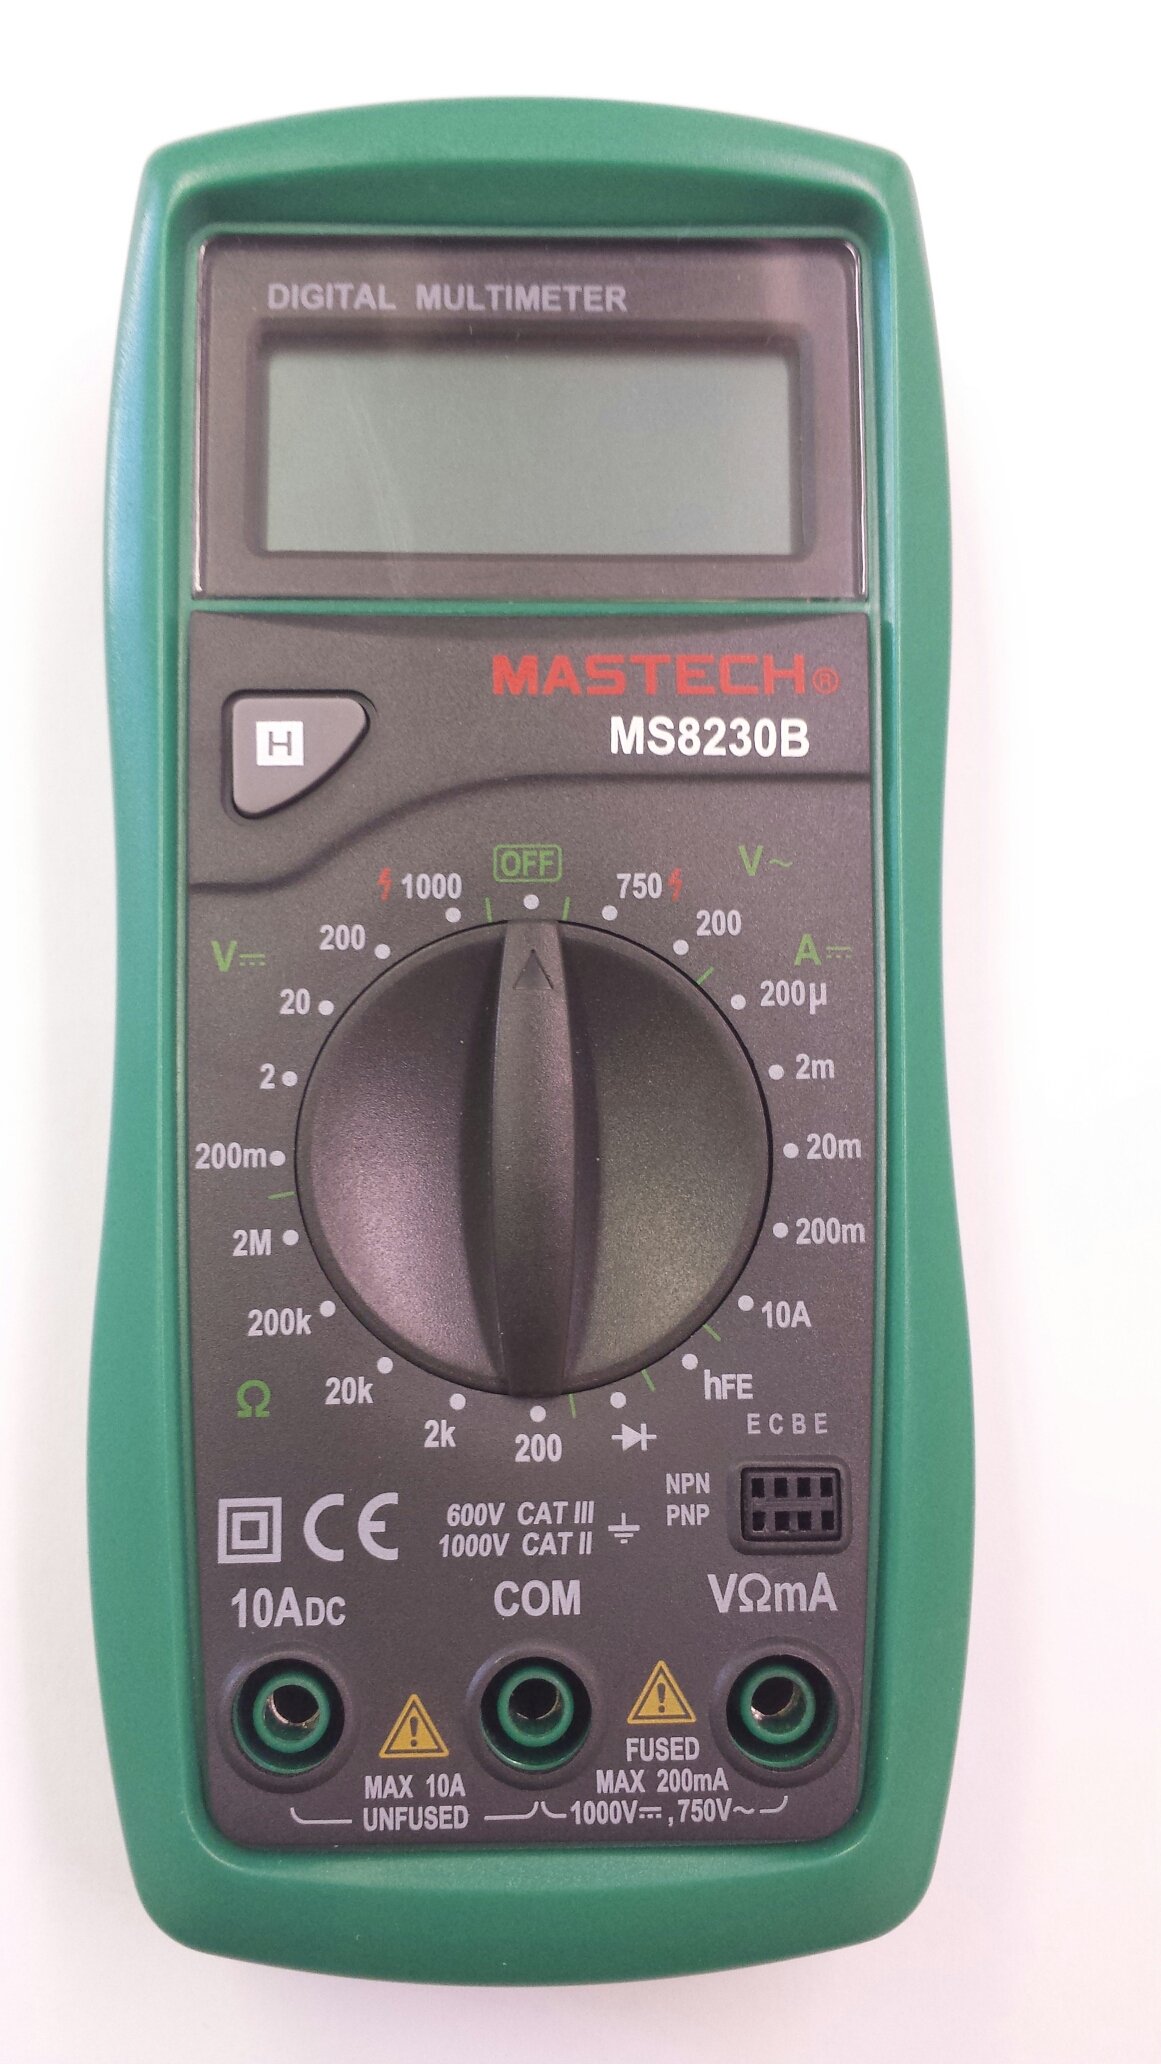
Image 1: Contents of the Mastech MS8230B package, including the multimeter, test leads, batteries, and user manual.
4. การตั้งค่า
4.1 การติดตั้งแบตเตอรี่
The MS8230B multimeter requires one 9V battery for operation. If the battery is not pre-installed or needs replacement:
- ตรวจสอบให้แน่ใจว่ามัลติมิเตอร์ปิดอยู่ และถอดสายวัดทั้งหมดออก
- ค้นหาฝาครอบช่องใส่แบตเตอรี่ที่ด้านหลังของเครื่อง
- Loosen the screw(s) on the battery cover and remove the cover.
- Connect the 9V battery to the battery connector, observing correct polarity.
- ใส่แบตเตอรี่ลงในช่องใส่แบตเตอรี่ แล้วปิดฝาให้สนิท โดยขันสกรูให้แน่น
4.2 การเชื่อมต่อสายทดสอบ
ควรต่อสายวัดให้ถูกต้องตามวิธีการวัดที่ต้องการเสมอ:
- เสียบสายวัดสีแดงเข้าไปในช่อง "VΩmA" สำหรับวัดระดับเสียงtagการวัดค่า e, ความต้านทาน และกระแสไฟฟ้าต่ำ
- Insert the red test lead into the "10ADC" jack for high DC current measurements (up to 10A).
- Always insert the black test lead into the "COM" (common) jack.
5. คู่มือการใช้งาน
Before taking any measurement, ensure the test leads are correctly connected and the function switch is set to the appropriate range.
5.1 DC ฉบับที่tagอี การวัด (DCV)
- เชื่อมต่อสายวัดสีแดงเข้ากับแจ็ค "VΩmA" และสายวัดสีดำเข้ากับแจ็ค "COM"
- Set the rotary switch to the desired DCV range (e.g., 200mV, 2V, 20V, 200V, 1000V). If the voltagเนื่องจากค่า e ไม่ทราบค่า จึงควรเริ่มต้นด้วยช่วงค่าสูงสุดและลดลงตามความจำเป็น
- ต่อสายวัดเข้ากับชิ้นส่วนหรือวงจรที่ต้องการวัด
- อ่านเล่มที่tage value on the LCD display. Observe the polarity indication.
5.2 AC โวลtagการวัดแบบ ACV
- เชื่อมต่อสายวัดสีแดงเข้ากับแจ็ค "VΩmA" และสายวัดสีดำเข้ากับแจ็ค "COM"
- Set the rotary switch to the desired ACV range (e.g., 200V, 750V). Start with the highest range if the voltagอีไม่เป็นที่รู้จัก
- ต่อสายวัดเข้ากับชิ้นส่วนหรือวงจรที่ต้องการวัด
- อ่านเล่มที่tagค่า e บนจอ LCD
5.3 การวัดกระแสไฟฟ้ากระแสตรง (DCA)
คำเตือน: ห้ามวัดกระแสไฟฟ้าในวงจรโดยใช้โวลต์มิเตอร์เด็ดขาดtage present by connecting the meter in parallel. Always connect the meter in series with the load.
- Determine the expected current. For currents up to 200mA, connect the red lead to "VΩmA". For currents up to 10A, connect the red lead to "10ADC". The black lead always goes to "COM".
- Set the rotary switch to the appropriate DCA range (e.g., 200µA, 2mA, 20mA, 200mA, 10A).
- Turn off the power to the circuit. Open the circuit where the current is to be measured.
- ต่อมัลติมิเตอร์แบบอนุกรมเข้ากับวงจร
- จ่ายไฟให้กับวงจรและอ่านค่ากระแสไฟฟ้าบนหน้าจอ LCD
5.4 การวัดความต้านทาน
คำเตือน: Ensure the circuit under test is completely de-energized and all capacitors are discharged before measuring resistance.
- เชื่อมต่อสายวัดสีแดงเข้ากับแจ็ค "VΩmA" และสายวัดสีดำเข้ากับแจ็ค "COM"
- Set the rotary switch to the desired Resistance (Ω) range (e.g., 200Ω, 2kΩ, 20kΩ, 200kΩ, 2MΩ).
- เชื่อมต่อสายทดสอบข้ามส่วนประกอบที่ต้องการวัด
- อ่านค่าความต้านทานบนจอ LCD
5.5 การทดสอบไดโอด
คำเตือน: Ensure the circuit under test is completely de-energized and all capacitors are discharged before performing a diode test.
- เชื่อมต่อสายวัดสีแดงเข้ากับแจ็ค "VΩmA" และสายวัดสีดำเข้ากับแจ็ค "COM"
- Set the rotary switch to the Diode symbol (→|).
- เชื่อมต่อสายวัดสีแดงเข้ากับขั้วบวก และสายวัดสีดำเข้ากับขั้วลบของไดโอด หน้าจอจะแสดงแรงดันไฟฟ้าไปข้างหน้าtagแรงดันตกคร่อม (โดยทั่วไปอยู่ที่ 0.5V ถึง 0.8V สำหรับไดโอดซิลิคอน)
- Reverse the test leads. The display should show "OL" (Open Loop) for a good diode. A reading in both directions or "0" indicates a shorted diode.
5.6 การทดสอบ hFE ของทรานซิสเตอร์
คำเตือน: Ensure the transistor is not connected to a live circuit.
- ตั้งสวิตช์แบบหมุนไปที่ตำแหน่ง "hFE"
- ระบุว่าทรานซิสเตอร์เป็น NPN หรือ PNP
- เสียบขาอีมิเตอร์ เบส และคอลเลคเตอร์ของทรานซิสเตอร์ลงในรูที่ตรงกันในซ็อกเก็ต hFE บนมัลติมิเตอร์
- อ่านค่า hFE (อัตราขยายกระแสตรง) บนหน้าจอ LCD
5.7 ฟังก์ชั่นการเก็บข้อมูล
Press the "H" button to hold the current reading on the display. Press it again to release the hold function and resume live readings.
6. การบำรุงรักษา
6.1 การทำความสะอาด
เช็ดเคสด้วยโฆษณาamp cloth and mild detergent. Do not use abrasives or solvents. Keep the jacks free of dust and debris.
6.2 การเปลี่ยนแบตเตอรี่
When the battery symbol appears on the LCD, the 9V battery needs to be replaced. Refer to section 4.1 for battery installation instructions.
6.3 การเปลี่ยนฟิวส์
The multimeter is protected by a fuse. If the current measurement function stops working, the fuse may need replacement. This should only be performed by qualified personnel. The fuse specifications are typically printed near the fuse holder or in the specifications section.
7 การแก้ไขปัญหา
If the multimeter does not function correctly, check the following:
- ไม่มีจอแสดงผลหรือจอแสดงผลจางๆ: ตรวจสอบแบตเตอรี่ เปลี่ยนใหม่หากจำเป็น
- การอ่านค่าที่ไม่ถูกต้อง: Ensure the test leads are properly connected, the function switch is on the correct range, and the battery is not low.
- แสดงข้อความ "OL" (Overload) : ค่าที่วัดได้เกินช่วงที่เลือกไว้ โปรดเปลี่ยนไปใช้ช่วงที่สูงกว่า
- การวัดกระแสไฟฟ้าไม่ทำงาน: ตรวจสอบฟิวส์.
หากปัญหายังคงอยู่ โปรดติดต่อฝ่ายสนับสนุนลูกค้า
8. ข้อมูลจำเพาะ
The Mastech MS8230B Digital Multimeter offers the following technical specifications:

Image 2: Detailed specifications for the Mastech MS8230B Multimeter, including display, range, and accuracy.
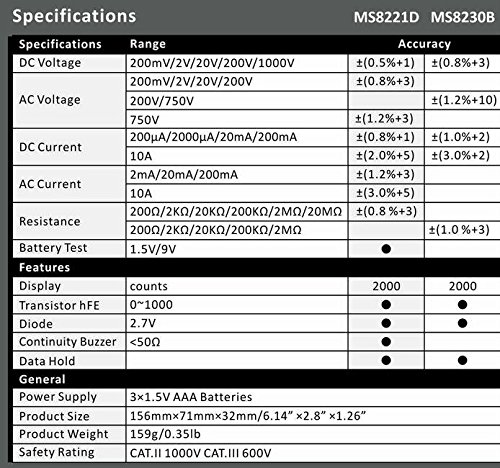
Image 3: Comparison table of specifications for Mastech MS8230B and MS8221D multimeters.
| ข้อมูลจำเพาะ | ค่า |
|---|---|
| แสดง | 1999 counts, 15mm digit height |
| DC ฉบับที่tagอี (DCV) | 200mV, 2V, 20V, 200V, 1000V (Accuracy: 0.5% to 0.8%) |
| ฉบับ ACtagอี (ACV) | 200V, 750V (Accuracy: 1.2%) |
| กระแสไฟฟ้ากระแสตรง (DCA) | 200µA, 2mA, 20mA, 200mA, 10A (Accuracy: 1.0% to 2.0%) |
| ความต้านทาน (Ω) | 200Ω, 2kΩ, 20kΩ, 200kΩ, 2MΩ (Accuracy: 0.8% to 1.0%) |
| การทดสอบ Diode | ไปข้างหน้าฉบับtagอี ดรอป |
| การทดสอบทรานซิสเตอร์ hFE | 1 ถึง 1000 |
| การเก็บข้อมูล | ใช่ |
| การบ่งชี้แบตเตอรี่ต่ำ | ใช่ |
| ระบบป้องกันการโอเวอร์โหลด | ใช่ |
| แหล่งพลังงาน | แบตเตอรี่ 1V 9 ก้อน |
| ขนาด (กว้าง x ยาว x สูง) | 15.2 x 7.6 x 2.5 ซม. (ประมาณ 6 x 3 x 1 นิ้ว) |
| น้ำหนัก | ประมาณ 158.76 ก. (5.6 ออนซ์) |
| ระดับความปลอดภัย | IEC 1010-1 CAT III 600V, CAT II 1000V |
| อุณหภูมิในการทำงาน | 0°C ถึง 40°C (32°F ถึง 104°F) |
| อุณหภูมิในการจัดเก็บ | -10°C ถึง 50°C (14°F ถึง 122°F) |
9. การรับประกันและการสนับสนุน
Mastech products are designed for reliability and performance. For specific warranty details, please refer to the warranty card included with your product or contact your local Mastech distributor.
For technical support or service inquiries, please contact Mastech customer service through their official webไซต์หรือข้อมูลการติดต่อที่ให้มาพร้อมกับเอกสารการซื้อของคุณ