1. สินค้าหมดview
The HP ProDisplay P17A is a 17-inch LED-backlit LCD monitor designed for general computing tasks. It features a 5:4 aspect ratio with a maximum resolution of 1280 x 1024 pixels, providing clear and consistent visuals. This monitor is equipped with both VGA and HDMI connectivity options, offering versatility for various system configurations. Its compact design and energy-efficient LED backlighting make it suitable for a range of environments.

รูปที่ 1 : ด้านหน้า view of the HP ProDisplay P17A monitor, showcasinก. การจัดแสดงและยืน
2. คำแนะนำในการตั้งค่า
2.1 การแกะกล่องมอนิเตอร์
นำส่วนประกอบทั้งหมดออกจากบรรจุภัณฑ์อย่างระมัดระวัง ตรวจสอบให้แน่ใจว่ามีส่วนประกอบต่อไปนี้:
- HP ProDisplay P17A Monitor
- Monitor Stand (base and neck)
- สายไฟ
- VGA Cable (may vary by region/package)
- HDMI Cable (may vary by region/package)
2.2 การประกอบขาตั้ง
- วางจอภาพคว่ำหน้าลงบนพื้นผิวที่นุ่มและสะอาดเพื่อป้องกันรอยขีดข่วน
- Attach the stand neck to the back of the monitor, aligning the tabs and pushing until it clicks into place.
- Attach the stand base to the bottom of the stand neck, securing it with the captive screw if present.
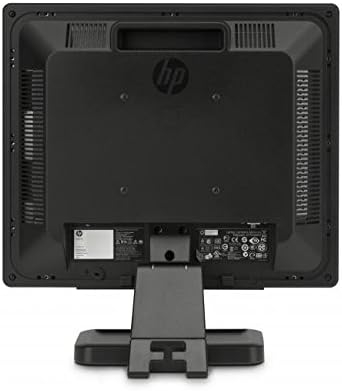
รูปที่ 2: ด้านหลัง view of the monitor, illustrating the stand attachment point and various connectivity ports.
2.3 สายเชื่อมต่อ
- การเชื่อมต่อไฟฟ้า: เชื่อมต่อสายไฟเข้ากับแหล่งจ่ายไฟของจอภาพ จากนั้นจึงเชื่อมต่อกับเต้ารับไฟฟ้าที่มีสายดิน
- การเชื่อมต่อวิดีโอ:
- For VGA: Connect one end of the VGA cable to the VGA port on the monitor and the other end to the VGA port on your computer. Tighten the screws on the VGA connector.
- For HDMI: Connect one end of the HDMI cable to the HDMI port on the monitor and the other end to the HDMI port on your computer.
- ตรวจสอบให้แน่ใจว่าการเชื่อมต่อทั้งหมดมีความปลอดภัย
3. คู่มือการใช้งาน
3.1 การเปิด/ปิดเครื่อง
กดปุ่มเปิด/ปิดที่อยู่ด้านหน้าของจอภาพเพื่อเปิดหรือปิดเครื่อง ไฟแสดงสถานะจะสว่างขึ้นเมื่อจอภาพเปิดใช้งาน
3.2 Adjusting Display Settings (OSD Menu)
The On-Screen Display (OSD) menu allows you to adjust various monitor settings. Use the buttons on the front bezel to navigate and select options.
- ปุ่มเมนู: เปิดเมนู OSD
- ปุ่มนำทาง (+ / - or Up/Down): Move through menu options and adjust values.
- ปุ่มเลือก/ตกลง: ยืนยันการเลือกหรือเข้าสู่เมนูย่อย
- ปุ่มออก: ออกจากเมนูหรือ OSD ปัจจุบัน
การตั้งค่าที่ปรับได้ทั่วไป ได้แก่:
- ความสว่าง/คอนทราสต์: Adjusts the overall luminance and difference between light and dark areas.
- การควบคุมสี: Allows adjustment of color temperature, RGB levels, or preset color modes.
- เลือกอินพุต: Manually switches between VGA and HDMI input sources.
- การควบคุมภาพ: Adjusts sharpness, aspect ratio, and auto-adjustment for analog signals.
- การจัดการ: Power-saving options, OSD timeout, language selection.
4. การบำรุงรักษา
4.1 การทำความสะอาดจอภาพ
- ควรปิดจอภาพและถอดสายไฟออกก่อนทำความสะอาดทุกครั้ง
- ใช้ผ้านุ่มไม่เป็นขุยค่อยๆ งampเคลือบด้วยน้ำหรือน้ำยาทำความสะอาดหน้าจอที่ไม่กัดกร่อน
- ห้ามฉีดน้ำยาทำความสะอาดลงบนหน้าจอหรือจอภาพโดยตรงasing.
- ควรหลีกเลี่ยงการใช้เบนซีน ทินเนอร์ น้ำยาทำความสะอาดที่มีส่วนผสมของแอมโมเนีย หรือวัสดุขัดถู เนื่องจากสารเหล่านี้อาจทำให้พื้นผิวเสียหายได้
4.2 การดูแลทั่วไป
- หลีกเลี่ยงการวางจอภาพให้โดนแสงแดดโดยตรงหรือใกล้แหล่งความร้อน
- ตรวจสอบให้แน่ใจว่ามีการระบายอากาศที่เพียงพอรอบๆ จอภาพ
- อย่าปิดกั้นช่องระบายอากาศ
- ป้องกันหน้าจอจากของมีคมหรือการกดทับมากเกินไป
5 การแก้ไขปัญหา
Before contacting support, try the following basic troubleshooting steps:
5.1 ไม่มีภาพปรากฏบนหน้าจอ
- Ensure the monitor's power cable is securely connected to both the monitor and a working electrical outlet.
- Verify the power indicator light on the monitor is on. If not, press the power button.
- Check that the video cable (VGA or HDMI) is securely connected to both the monitor and the computer.
- Ensure the correct input source is selected on the monitor (use the OSD menu to switch inputs).
- รีสตาร์ทเครื่องคอมพิวเตอร์ของคุณ
5.2 คุณภาพของภาพไม่ดี
- Fuzzy or Blurry Image: ตรวจสอบให้แน่ใจว่าความละเอียดการแสดงผลบนคอมพิวเตอร์ของคุณถูกตั้งค่าเป็นความละเอียดดั้งเดิมของจอภาพ (1280 x 1024)
- สีไม่ถูกต้อง: Adjust color settings through the OSD menu or your computer's display settings.
- Image Off-Center/Incorrect Size (VGA only): Use the "Auto Adjust" function in the OSD menu.
- การกะพริบ: Check the refresh rate setting on your computer; ensure it is set to 60 Hz.
5.3 Monitor Not Responding to Buttons
- Unplug the monitor's power cable, wait 10 seconds, then plug it back in and try again.
- ตรวจสอบให้แน่ใจว่าไม่มีปุ่มใดค้างอยู่
6. ข้อมูลจำเพาะทางเทคนิค
| คุณสมบัติ | ข้อมูลจำเพาะ |
|---|---|
| ยี่ห้อ | ฮิวเล็ตแพ็กการ์ด |
| ชื่อรุ่น | HP P17A |
| หมายเลขรุ่น | F4M97AAABA |
| ขนาดหน้าจอ | 17 นิ้ว |
| ประเภทจอภาพ | LED แบ็คไลท์ LCD |
| ความละเอียดดั้งเดิม | 1280 x 1024 (SXGA) |
| อัตราส่วนภาพ | 5:4 น. |
| อัตราส่วนคอนทราสต์ | 1000:1 น. |
| อัตราการรีเฟรช | 60 เฮิรตซ์ |
| เวลาตอบสนอง | 5 มิลลิวินาที |
| Viewอิงแองเกิล | 170 องศา |
| การเชื่อมต่อ | 1x VGA, 1x HDMI |
| การใช้พลังงาน | 25 วัตต์ (สูงสุด) |
| ขนาดสินค้า (ลึก x กว้าง x สูง) | ลึก 8.12 นิ้ว x กว้าง 14.85 นิ้ว x สูง 15.24 นิ้ว |
| น้ำหนักสินค้า | 8.2 ปอนด์ |
| ประเภทการติดตั้ง | ติดตั้งบนผนัง (รองรับมาตรฐาน VESA) |
| คุณสมบัติเพิ่มเติม | Anti Glare Screen |

Figure 3: Dimensions of the HP ProDisplay P17A monitor.
7. การรับประกันและการสนับสนุน
7.1 ข้อมูลการรับประกัน
This product is often sold as a refurbished item. Refurbished products typically come with a limited warranty provided by the refurbisher or seller. Please refer to your purchase documentation for specific warranty terms and conditions, including duration and coverage details.
7.2 การสนับสนุนด้านเทคนิค
For technical assistance, troubleshooting beyond this manual, or warranty claims, please contact the vendor or HP customer support. Have your monitor's model number (F4M97AAABA) and serial number ready when contacting support.
You can find additional support resources, drivers, and documentation on the official HP support webเว็บไซต์.