
1. บทนำ
This manual provides essential information for the proper setup, operation, and maintenance of your Dual DAB 2 A DAB/DAB+ Radio Adapter. Please read these instructions carefully before using the device to ensure optimal performance and safety. The Dual DAB 2 A allows you to upgrade your existing stereo system with digital radio reception (DAB/DAB+) and traditional FM radio.
2. ข้อมูลด้านความปลอดภัย
- แหล่งพลังงาน: ใช้เฉพาะอะแดปเตอร์ไฟฟ้าที่ระบุเท่านั้น ตรวจสอบให้แน่ใจว่าระดับเสียงtage ตรงตามข้อกำหนดของอุปกรณ์
- น้ำและความชื้น: อย่าวางอุปกรณ์ไว้ในที่ที่มีฝน ความชื้น หรือของเหลวหยด/กระเด็น อย่าวางสิ่งของที่บรรจุของเหลว เช่น แจกัน ไว้บนอุปกรณ์
- การระบายอากาศ : ตรวจสอบให้แน่ใจว่ามีการระบายอากาศที่เพียงพอ อย่าปิดกั้นช่องระบายอากาศ
- ความร้อน: ควรวางอุปกรณ์ให้ห่างจากแหล่งความร้อน เช่น เครื่องทำความร้อน ช่องระบายความร้อน เตา หรืออุปกรณ์อื่นๆ (รวมถึง) ampเครื่องให้ความร้อน) ที่ผลิตความร้อน
- การทำความสะอาด: Unplug the device from the power outlet before cleaning. Use a soft, dry cloth. Do not use liquid cleaners or aerosol cleaners.
- การบริการ: อย่าพยายามให้บริการผลิตภัณฑ์นี้ด้วยตนเอง ส่งต่อการบริการทั้งหมดไปยังช่างบริการที่ผ่านการรับรอง
3. เนื้อหาบรรจุภัณฑ์
โปรดตรวจสอบว่ารายการทั้งหมดที่ระบุไว้ด้านล่างรวมอยู่ในแพ็คเกจของคุณหรือไม่:
- Dual DAB 2 A Radio Adapter
- อะแดปเตอร์แปลงไฟ
- External Antenna (wire with connector)
- รีโมทคอนโทรล
- คู่มือการใช้งาน (เอกสารนี้)
4. สินค้าหมดview
4.1 แผงด้านหน้า
The front panel features the main display and controls for operating the device.

ภาพที่ 4.1: ด้านหน้า view of the Dual DAB 2 A radio adapter. The display shows the current time (14:28) and the selected station ("Senderliste #Galaxy"). The "DAB+" logo is visible at the top left, and "Dual" is printed at the bottom center.

ภาพที่ 4.2: ด้านหน้าทำมุม view of the Dual DAB 2 A, providing a clearer look at the illuminated multi-line LCD display and the device's compact design.
4.2 แผงด้านหลังและการเชื่อมต่อ
The rear panel contains all necessary connection ports for power, antenna, and audio output.

ภาพที่ 4.3: หลัง view of the Dual DAB 2 A. From left to right, the ports are: สายออก (3.5mm audio jack), กระแสตรง 6.0V=0.5A (power input), เสาอากาศ (coaxial connector for external antenna), and พลัง ปุ่ม.

ภาพที่ 4.4: ด้านข้าง view of the Dual DAB 2 A, illustrating its compact and slightly curved profile.

ภาพที่ 4.5: ด้านมุม view showing the rear connections, including the Line Out, DC power input, and antenna port.
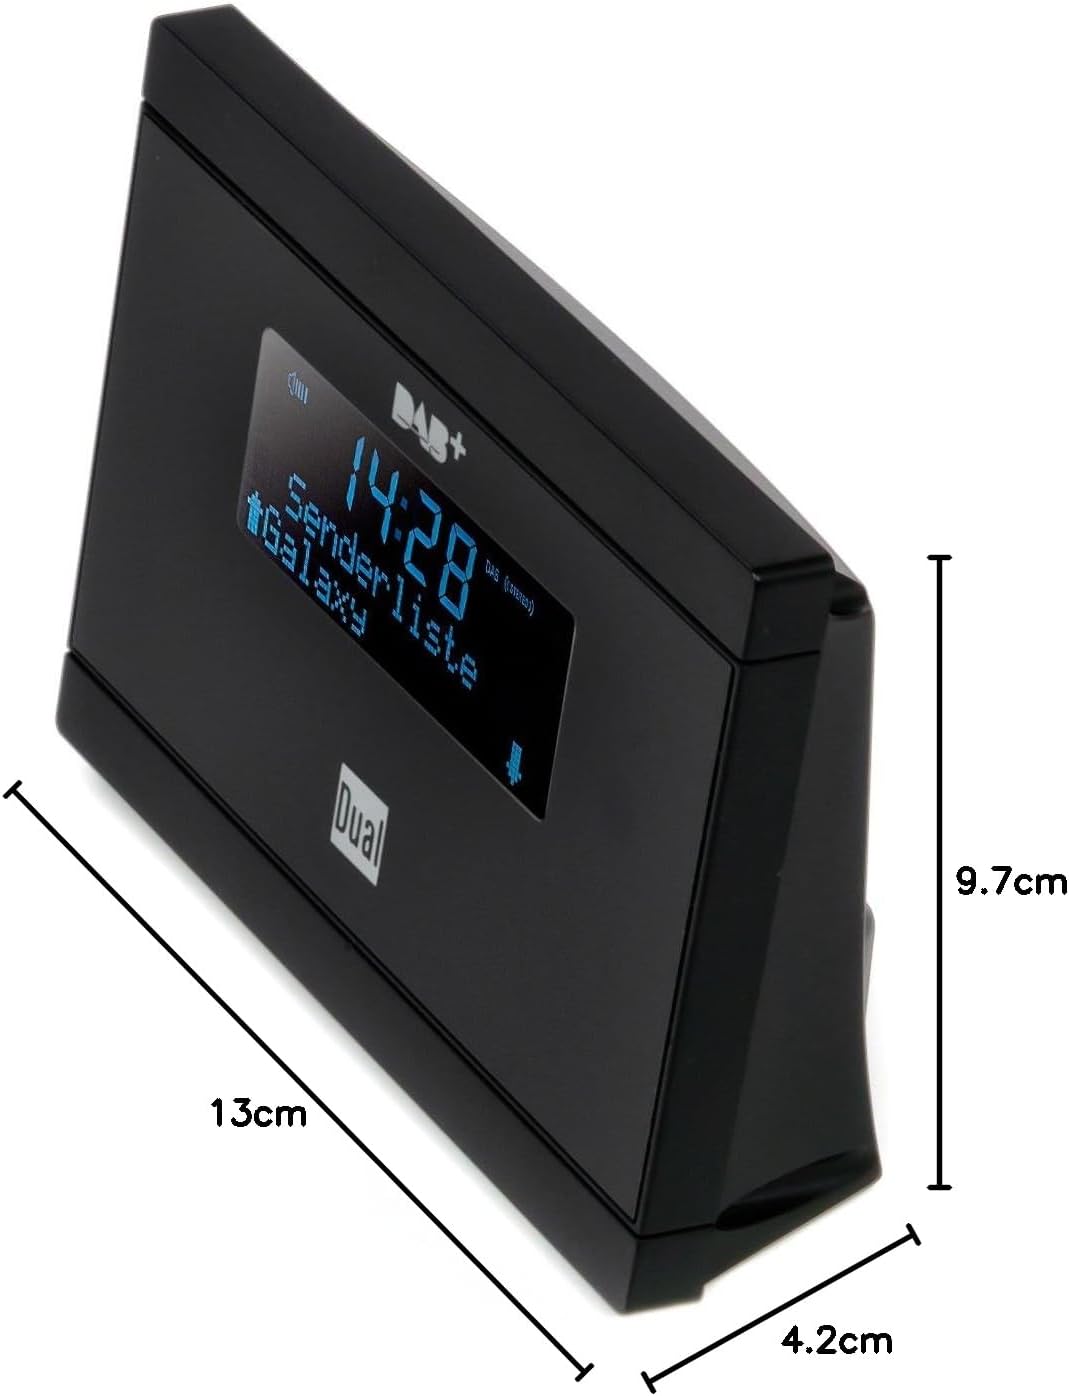
ภาพที่ 4.6: Dimensions of the Dual DAB 2 A: 13 cm (length), 4.2 cm (width), and 9.7 cm (height).
5. การตั้งค่า
5.1 การเชื่อมต่อเสาอากาศ
- ค้นหาตำแหน่ง เสาอากาศ port on the rear of the DAB 2 A.
- Connect the supplied external wire antenna to this port.
- For optimal reception, position the antenna away from other electronic devices and metallic objects. You may also connect a commercially available external antenna for improved signal quality.
5.2 Connecting to your Stereo System
- ค้นหาตำแหน่ง สายออก (3.5mm jack) on the rear of the DAB 2 A.
- Connect an audio cable (not supplied) from the สายออก of the DAB 2 A to an available audio input (e.g., AUX IN, LINE IN) on your existing stereo system or audio device.
5.3 การเชื่อมต่อสายไฟ
- เชื่อมต่ออะแดปเตอร์แปลงไฟที่ให้มากับ... กระแสตรง 6.0V=0.5A port on the rear of the DAB 2 A.
- เสียบอะแดปเตอร์ไฟฟ้าเข้ากับเต้ารับไฟฟ้าที่เหมาะสม
6. คู่มือการใช้งาน
6.1 การเปิด/ปิดเครื่อง
กดปุ่ม พลัง button on the rear of the device or on the remote control to turn the unit on or off.
6.2 Initial Scan (DAB/DAB+)
Upon first power-on, the device will automatically perform a scan for available DAB/DAB+ stations. This process may take a few minutes. Once complete, the first available station will begin playing.
6.3 Switching Between DAB/DAB+ and FM
ใช้ โหมด button on the remote control or the device (if available) to switch between DAB/DAB+ and FM radio modes.
6.4 Tuning and Station Selection
- แต้ม/แต้ม+: ใช้ ขึ้น/ลง arrow buttons on the remote control or device to navigate through the list of available digital stations.
- เอฟเอ็ม: ในโหมด FM ให้ใช้ ขึ้น/ลง arrow buttons to manually tune frequencies or initiate an automatic scan for the next available station.
6.5 การบันทึกและการเรียกใช้ค่าที่ตั้งไว้ล่วงหน้า
The DAB 2 A allows you to store up to 20 favorite stations (DAB/DAB+ and FM combined).
- การเก็บรักษา: ปรับไปที่สถานีที่ต้องการ กดปุ่มค้างไว้ พรีเซ็ต button (or similar, refer to remote control layout) until the display shows a preset number. Use the arrow buttons to select a preset number (1-20) and confirm.
- ในการเรียกคืน: กดปุ่ม พรีเซ็ต button briefly, then use the arrow buttons to select the desired preset station.
6.6 ฟังก์ชั่นนาฬิกา นาฬิกาปลุก และตั้งเวลาปิดเครื่อง
The device features a clock, alarm, and sleep timer. Refer to the detailed instructions in the full manual for setting these functions. The alarm can be set to wake you with DAB, FM, or a buzzer sound.
7. การบำรุงรักษา
- การทำความสะอาด: Always unplug the device before cleaning. Use a soft, dry, lint-free cloth to wipe the surfaces. Do not use abrasive cleaners, waxes, or solvents.
- พื้นที่จัดเก็บ: If not in use for an extended period, unplug the device and store it in a cool, dry place.
8 การแก้ไขปัญหา
| ปัญหา | สาเหตุที่เป็นไปได้ | สารละลาย |
|---|---|---|
| ไม่มีไฟฟ้า | ไม่ได้เชื่อมต่ออะแดปเตอร์ไฟหรือเต้ารับไฟฟ้าชำรุด | ตรวจสอบให้แน่ใจว่าอะแดปเตอร์ไฟฟ้าเชื่อมต่อกับอุปกรณ์และเต้ารับไฟฟ้าที่ใช้งานได้อย่างปลอดภัย |
| ไม่มีเสียง | Audio cable not connected, incorrect input selected on stereo, or volume too low. | Check audio cable connection. Select the correct input on your stereo system. Increase volume on both the DAB 2 A and your stereo. |
| Poor DAB/DAB+ reception or no stations found | Weak signal, antenna not properly connected or positioned. | Ensure the antenna is securely connected and positioned for optimal reception. Try repositioning the antenna. Consider using a higher-gain external antenna. Perform a full scan for stations. |
| การรับสัญญาณ FM ไม่ดี | Weak signal, antenna not properly connected or positioned. | Extend and reposition the wire antenna. Try a different antenna if available. |
| รีโมตคอนโทรลไม่ทำงาน | Batteries are dead or incorrectly inserted, or line of sight is blocked. | Replace batteries with new ones, ensuring correct polarity. Remove any obstructions between the remote and the device. |
9. ข้อมูลจำเพาะ
| คุณสมบัติ | รายละเอียด |
|---|---|
| ยี่ห้อ | คู่ |
| หมายเลขรุ่น | DAB 2 A |
| สี | สีดำ |
| เทคโนโลยีการเชื่อมต่อ | ช่องต่อเสริม (ช่องต่อ Line Out 3.5 มม.) |
| คุณสมบัติพิเศษ | DAB/DAB+ Radio, FM Tuner, Clock, Alarm, Sleep Function |
| อุปกรณ์ที่รองรับ | Devices with 3.5 mm audio connector |
| ขนาดสินค้า (กว้าง x ยาว x สูง) | 13 ซม. x 4.2 ซม. x 9.7 ซม. |
| เทคโนโลยีการปรับแต่ง | FM, DAB, DAB+ |
| แหล่งพลังงาน | Electric Cable (DC 6.0V=0.5A) |
| แถบความถี่วิทยุที่รองรับ | FM, DAB, DAB+ |
| น้ำหนักสินค้า | 200 กรัม |
10. การรับประกันและการสนับสนุน
For warranty information and technical support, please refer to the documentation provided with your purchase or contact Dual customer service. Keep your proof of purchase for any warranty claims.
