
1. บทนำ
The Vividia USB Flexible Inspection Camera is designed for detailed visual inspection in areas that are difficult to access. This device connects to your PC via a USB interface and is powered directly by the USB connection, eliminating the need for external batteries. Its 95cm (3.1ft) flexible cable allows for maneuverability into various shapes to reach confined spaces.
Equipped with a 1/6" VGA CMOS sensor, 5x zoom function, and two built-in adjustable LED lights, the camera captures snapshots and videos with clear color. The camera head and cable are waterproof, making it suitable for wet environments. The small 11.2mm camera head is ideal for close-up inspections in tight areas, such as automotive maintenance, electrical repair, plumbing, and HVAC/R applications.

Figure 1: Vividia USB Flexible Inspection Camera Borescope Endoscope.
เนื้อหาแพ็คเกจ:
- กล้องตรวจสอบ USB
- ซีดีซอฟต์แวร์
- Attachment Set (magnetic pick-up, hook, and mirror)
- คู่มือการใช้งาน (เอกสารนี้)
- กระเป๋าใส่พลาสติก
2. ข้อมูลด้านความปลอดภัย
- Do not use this device for medical purposes or internal human/animal examination.
- Keep the device away from strong magnetic fields or high-voltage สภาพแวดล้อม
- Ensure the USB connection is secure before operation.
- The camera head and cable are waterproof; however, the handle and USB connector are not. Do not immerse the handle or USB connector in liquids.
- Avoid bending the flexible cable excessively or sharply, as this may damage internal wiring.
- Store the device in its carrying case when not in use to prevent damage.
- ห้ามถอดประกอบหรือดัดแปลงอุปกรณ์ด้วยตนเอง โปรดติดต่อช่างผู้ชำนาญการเพื่อขอรับบริการ
3. การตั้งค่า
3.1 ข้อกำหนดของระบบ
The Vividia USB Flexible Inspection Camera is compatible with Windows 7, Windows Vista, and Windows XP operating systems.
3.2 การติดตั้งซอฟต์แวร์
- ใส่แผ่นซีดีซอฟต์แวร์ที่ให้มาลงในไดรฟ์ซีดี/ดีวีดีของคอมพิวเตอร์ของคุณ
- Follow the on-screen instructions to install the necessary drivers and application software. If the installation does not start automatically, browse the CD content and run the setup file (e.g., "setup.exe").
- Once the software is installed, restart your computer if prompted.
3.3 การเชื่อมต่อกล้อง
- Ensure the software is installed and your computer is ready.
- Connect the USB plug of the inspection camera to an available USB port on your PC.
- ระบบปฏิบัติการควรตรวจจับอุปกรณ์โดยอัตโนมัติ
- Launch the installed inspection camera software. The live video feed from the camera should appear on your screen.

Figure 2: Proper handling of the inspection camera during setup or operation.
4. คู่มือการใช้งาน
4.1 การทำงานพื้นฐาน
- การวางตำแหน่งกล้อง: Gently bend the flexible cable to guide the camera head into the desired inspection area. The cable retains its shape for precise positioning.
- การปรับความสว่าง: Use the brightness control wheel on the handle to adjust the intensity of the two built-in LED lights. This helps illuminate dark inspection areas.
- ฟังก์ชั่นซูม: The camera features a 5x digital zoom. Use the zoom buttons on the handle to magnify the image on your screen.
- Capturing Snapshots: Press the Snapshot Button on the handle to capture a still image of the current view. Images are saved in JPEG format. Alternatively, you can use the software interface to take snapshots.
- การบันทึกวิดีโอ: Use the software interface to start and stop video recording. Videos are saved in AVI format.
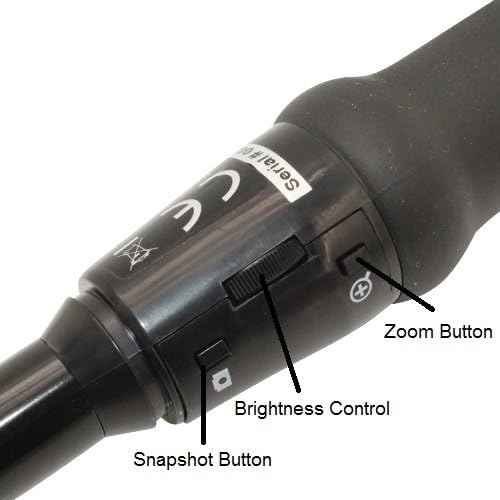
Figure 3: Controls on the camera handle: Snapshot Button, Brightness Control, and Zoom Button.
4.2 การใช้สิ่งที่แนบมา
The inspection camera comes with an attachment set to enhance its functionality:
- Magnetic Pick-up: Attach the magnetic probe to the camera head to retrieve small metallic objects from hard-to-reach places.
- ตะขอ: Use the hook attachment to retrieve small non-magnetic objects or to maneuver cables.
- กระจกเงา: Attach the mirror to the camera head to view objects located at a right angle to the camera's direct line of sight. This is useful for inspecting sides of pipes or behind obstacles.

Figure 4: The inspection camera with its included attachment set.

รูปที่ 5: อดีตample of an attachment (hook) installed on the camera head.
4.3 การใช้งานทั่วไป
This inspection camera is suitable for various applications, including:
- Automotive maintenance (engine inspection, checking fluid lines)
- Electrical repair (inspecting wiring in conduits, junction boxes)
- Plumbing applications (checking pipes for blockages, leaks)
- HVAC/R (inspecting ducts, vents, internal components)
- General visual inspection of inaccessible areas in homes or workshops.

Figure 6: The inspection camera in use for examining pipes.
5. การบำรุงรักษา
- การทำความสะอาดหัวกล้อง: The camera head is waterproof. After use in wet or dirty environments, gently wipe the lens and camera head with a soft, damp ผ้า ห้ามใช้สารทำความสะอาดที่มีฤทธิ์กัดกร่อนหรือตัวทำละลาย
- การทำความสะอาดสายเคเบิล: Wipe the flexible cable with a damp ผ้าเพื่อขจัดสิ่งสกปรกหรือเศษต่างๆ
- พื้นที่จัดเก็บ: When not in use, store the inspection camera and its accessories in the provided plastic carrying case. Ensure the cable is coiled loosely and not kinked. Store in a cool, dry place away from direct sunlight and extreme temperatures.
- การอัปเดตซอฟต์แวร์: ตรวจสอบผู้ผลิตเป็นระยะ website for any available software or driver updates to ensure optimal performance and compatibility.
6 การแก้ไขปัญหา
| ปัญหา | สาเหตุที่เป็นไปได้ | สารละลาย |
|---|---|---|
| ไม่มีภาพปรากฏบนหน้าจอ |
|
|
| Poor image quality / Dark image. |
|
|
| Snapshot/Video recording not working. |
|
|
7. ข้อมูลจำเพาะ
| คุณสมบัติ | รายละเอียด |
|---|---|
| เซ็นเซอร์ | 1/6" VGA CMOS |
| ความละเอียดของภาพ | 640x480 pixels (JPEG) |
| ความละเอียดวิดีโอ | 640x480 pixels (AVI, up to 30FPS) |
| ระยะโฟกัส | 6cm - infinite |
| ซูมดิจิตอล | 5x |
| เลนส์ | F#2.8 with 54° viewมุมที่สามารถ |
| การส่องสว่าง | ไฟ LED สีขาว 2 ดวง ปรับความสว่างได้ |
| ความต้านทานต่อน้ำ | Camera head & cable are waterproof (handle is NOT waterproof) |
| Cable Length (Flexible) | 95 ซม. (3.1 ฟุต) |
| เส้นผ่านศูนย์กลางของสายเคเบิล | 9mm (0.35in) |
| Camera Head Outer Diameter | 11.2mm (0.44in) |
| ความยาวสาย USB | 200 ซม. (6 ฟุต) |
| อินเทอร์เฟซ | ยูเอสบี 1.1 |
| ระบบปฏิบัติการที่รองรับ | Windows 7/Vista/XP |
| หมายเลขรุ่น | VV-Flex-Cam-11 |
| ยูพีซี | 858499002544 |
8. การรับประกันและการสนับสนุน
8.1 การรับประกันของผู้ผลิต
This Vividia USB Flexible Inspection Camera (Model: VV-Flex-Cam-11) is covered by a การรับประกันจากผู้ผลิต 1 ปี นับจากวันที่ซื้อสินค้า การรับประกันนี้ครอบคลุมถึงข้อบกพร่องในวัสดุและฝีมือการผลิตภายใต้การใช้งานปกติ ไม่ครอบคลุมถึงความเสียหายที่เกิดจากการใช้งานผิดวิธี อุบัติเหตุ การดัดแปลงโดยไม่ได้รับอนุญาต หรือการติดตั้งที่ไม่ถูกต้อง
โปรดเก็บหลักฐานการซื้อของคุณไว้เพื่อเรียกร้องการรับประกัน
8.2 การสนับสนุนด้านเทคนิค
For technical assistance, troubleshooting, or warranty inquiries, please contact your retailer or the manufacturer, VIVIDIA. Refer to the contact information provided with your product packaging or visit the official VIVIDIA webเว็บไซต์สำหรับทรัพยากรสนับสนุน