การแนะนำ
ขอบคุณสำหรับการซื้อasing the Edifier Tick Tock Retro Multifunctional Alarm Clock. This device combines a retro design with modern functionality, offering an alarm clock, FM radio, and media playback from SD cards, USB drives, and auxiliary input. This manual provides detailed instructions for setup, operation, and maintenance to ensure optimal performance and longevity of your device.
คุณสมบัติผลิตภัณฑ์
- SD card reader and USB input port for media playback.
- LCD display screen for time, date, alarm status, and input mode (SD/USB/FM/AUX).
- Alarm clock function with customizable audio sources: SD card, USB drive, FM radio, or Auxiliary input.
- Auxiliary 3.5mm input jack for connecting external audio devices.
- FM radio function with 24 preset channels for easy access to your favorite stations.
- Two 360° omni-directional full-range speakers for rich, multi-directional sound.
การควบคุมและพอร์ต
พอร์ตแผงด้านหลัง
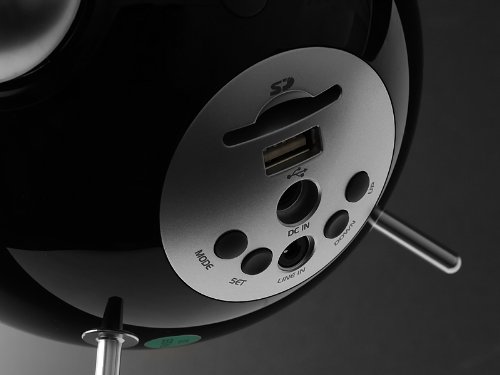
This image displays the rear panel of the Edifier Tick Tock alarm clock. Visible ports and buttons include:
- ช่องเสียบการ์ด SD: Insert an SD card for music playback.
- พอร์ต USB: เชื่อมต่อแฟลชไดรฟ์ USB เพื่อเล่นเพลง
- DC IN: ช่องเสียบไฟสำหรับอะแดปเตอร์ AC ที่ให้มาในชุด
- ไลน์อิน (AUX): ช่องเสียบสัญญาณเสียง 3.5 มม. สำหรับอุปกรณ์ภายนอก
- ปุ่มโหมด: Cycles through input modes (SD, USB, FM, AUX).
- ปุ่ม ตลท.: Used for entering settings menus (e.g., time, alarm).
- ปุ่มขึ้น/ลง: Navigate menus, adjust volume, or change settings.
แผงควบคุมด้านบน

This image shows the top panel controls of the Edifier Tick Tock alarm clock. These include:
- ปุ่มเล่น/หยุดชั่วคราว: เริ่มหรือหยุดการเล่นสื่อชั่วคราว
- ปุ่มแทร็กก่อนหน้า/ถัดไป: Skips to the previous or next track during media playback. Also used for tuning FM radio.
- ปุ่มปรับระดับเสียงขึ้น / ลง: ปรับระดับเสียงเอาต์พุต
- ปุ่มเลื่อนปลุก/ไฟ: เปิดใช้งานฟังก์ชั่นเลื่อนปลุกระหว่างการปลุก หรือปรับความสว่างหน้าจอ
การตั้งค่า
- การแกะกล่อง: Carefully remove the alarm clock and all accessories from the packaging. Ensure all components are present: the alarm clock unit, AC power adapter, and this user manual.
- การเชื่อมต่อไฟฟ้า: Connect the AC power adapter to the "DC IN" port on the rear of the alarm clock. Plug the adapter into a standard wall outlet. The display should illuminate.
- เปิดเครื่องครั้งแรก: The unit should power on automatically. If not, press the power button (if available, otherwise it's always on when plugged in).
- Antenna (FM Radio): Extend the FM antenna located at the back of the unit for optimal radio reception.
คำแนะนำการใช้งาน
การตั้งเวลาและวันที่
- กดปุ่มค้างไว้ ชุด กดปุ่มค้างไว้จนกว่าหน้าจอแสดงเวลาจะเริ่มกระพริบ
- ใช้ UP และ ลง ปุ่มสำหรับปรับชั่วโมง กด ชุด เพื่อยืนยันและดำเนินการต่อในส่วนของรายงานการประชุม
- ปรับนาทีโดยใช้ UP และ ลง. กด ชุด เพื่อยืนยัน.
- Continue this process to set the year, month, and day. Press ชุด to exit the time/date setting mode.
การตั้งปลุก
- กดปุ่ม ชุด button once (do not hold) to enter alarm setting mode. The alarm time will flash.
- ใช้ UP และ ลง กดปุ่มเพื่อปรับเวลาปลุก ชุด เพื่อยืนยันและดำเนินการต่อในส่วนของรายงานการประชุม
- ปรับนาทีโดยใช้ UP และ ลง. กด ชุด เพื่อยืนยัน.
- Next, select the alarm source (FM, SD, USB, AUX). Use UP และ ลง to cycle through options. Press ชุด เพื่อยืนยัน.
- If FM is selected, use UP และ ลง to select a preset FM station (P01-P24).
- If SD or USB is selected, ensure a card/drive with audio is inserted. The alarm will play the first track.
- If AUX is selected, ensure an external device is connected and playing audio.
- กด ชุด กดอีกครั้งเพื่อเปิดใช้งานสัญญาณเตือน ไอคอนสัญญาณเตือนจะปรากฏบนหน้าจอแสดงผล
- To deactivate the alarm, press ชุด until the alarm icon disappears.
- เมื่อเสียงปลุกดัง ให้กด สนูซ / ไลท์ button to activate snooze (typically 9 minutes). To turn off the alarm completely, press any other button.
การทำงานของวิทยุ FM
- กดปุ่ม โหมด กดปุ่มซ้ำๆ จนกว่า "FM" จะปรากฏบนหน้าจอ
- Auto Scan and Preset: กดปุ่มค้างไว้ เล่น/หยุดชั่วคราว button. The radio will automatically scan for available stations and save them to presets (P01-P24).
- การปรับด้วยตนเอง: ใช้ แทร็กก่อนหน้า/ถัดไป ปุ่มสำหรับปรับความถี่อย่างละเอียด
- การเลือกค่าที่ตั้งไว้ล่วงหน้า: ในโหมด FM ให้กดปุ่มสั้นๆ แทร็กก่อนหน้า/ถัดไป ปุ่มสำหรับสลับไปมาระหว่างสถานีที่ตั้งค่าไว้ล่วงหน้า
- ปรับระดับเสียงโดยใช้ UP และ ลง buttons on the rear panel.
SD Card / USB Playback
- Insert an SD card into the SD card slot or a USB flash drive into the USB port on the rear panel.
- กดปุ่ม โหมด button repeatedly until "SD" or "USB" appears on the display. The device will automatically start playing audio files.
- ใช้ เล่น/หยุดชั่วคราว ปุ่มเพื่อหยุดชั่วคราวหรือเล่นต่อ
- ใช้ แทร็กก่อนหน้า/ถัดไป buttons on the top panel to skip tracks.
- ปรับระดับเสียงโดยใช้ UP และ ลง buttons on the rear panel.
Auxiliary Input (LINE IN)
- Connect an external audio device (e.g., smartphone, MP3 player) to the "LINE IN" (3.5mm) port on the rear panel using an audio cable (not included).
- กดปุ่ม โหมด กดปุ่มซ้ำๆ จนกว่าคำว่า "AUX" จะปรากฏบนหน้าจอ
- เริ่มเล่นบนอุปกรณ์ภายนอกที่เชื่อมต่อของคุณ
- ปรับระดับเสียงโดยใช้ UP และ ลง buttons on the rear panel, and also control volume from your external device.
ความสว่างของจอภาพ
กดปุ่มสั้นๆ สนูซ / ไลท์ button on the top panel to cycle through different display brightness levels.
การซ่อมบำรุง
- การทำความสะอาด: Use a soft, dry cloth to clean the surface of the alarm clock. Do not use abrasive cleaners, waxes, or solvents.
- การจัดวาง: Place the unit on a stable, flat surface. Avoid direct sunlight, high temperatures, humidity, or dusty environments.
- พลัง: หากไม่ได้ใช้งานเครื่องเป็นเวลานาน ควรถอดอะแดปเตอร์แปลงไฟออกจากเต้ารับที่ผนัง
การแก้ไขปัญหา
| ปัญหา | สาเหตุที่เป็นไปได้ / วิธีแก้ไข |
|---|---|
| ไม่มีไฟเลี้ยง / หน้าจอปิด |
|
| ไม่มีเสียงออกจากลำโพง |
|
| การรับสัญญาณวิทยุ FM ไม่ดี |
|
| Alarm does not sound or plays static |
|
| จอแสดงผลสว่างเกินไปในเวลากลางคืน |
|
ข้อมูลจำเพาะ
| ยี่ห้อ | เครื่องช่วยสอน |
| หมายเลขรุ่น | MF240Reto |
| ประเภทจอภาพ | จอแอลซีดี |
| เทคโนโลยีการเชื่อมต่อ | อ๊อกซ์, ยูเอสบี |
| คุณสมบัติพิเศษ | Alarm, Radio, SD Card Reader, USB Playback |
| แหล่งพลังงาน | สายไฟ |
| วัสดุ | พลาสติก |
| น้ำหนักสินค้า | 0.74 ปอนด์ (ประมาณ 0.34 กก.) |
| ผู้ผลิต | เอดิไฟเออร์ สหรัฐอเมริกา |
การรับประกันและการสนับสนุน
This Edifier product comes with a รับประกันจากผู้ผลิต 2 ปี. For warranty claims, technical support, or further assistance, please contact Edifier USA customer service. Please retain your proof of purchase for warranty validation.
สำหรับข้อมูลการสนับสนุนล่าสุด โปรดเยี่ยมชมเว็บไซต์อย่างเป็นทางการของ Edifier webเว็บไซต์.