
Quantum J-32U Portable CD/MP3 Player, USB, Radio, and Cassette Recorder User Manual
Model: J-32U
1. บทนำ
ขอบคุณสำหรับการซื้อasing the Quantum J-32U Portable CD/MP3 Player, USB, Radio, and Cassette Recorder. This device is designed to provide versatile audio playback and recording capabilities in a compact, portable unit. Please read this manual thoroughly before operating the unit to ensure proper use and to maximize its performance.
เก็บคู่มือนี้ไว้เพื่อใช้อ้างอิงในอนาคต
2. คำแนะนำด้านความปลอดภัยที่สำคัญ
- แหล่งพลังงาน: Operate the unit only from the power source indicated on the marking label.
- การระบายอากาศ : อย่าปิดกั้นช่องระบายอากาศใดๆ ติดตั้งตามคำแนะนำของผู้ผลิต
- น้ำและความชื้น: ห้ามใช้อุปกรณ์นี้ใกล้น้ำหรือความชื้น
- การทำความสะอาด: ทำความสะอาดด้วยผ้าแห้งเท่านั้น
- ความร้อน: ห้ามติดตั้งใกล้แหล่งความร้อน เช่น หม้อน้ำ เครื่องทำความร้อน เตา หรืออุปกรณ์อื่น ๆ (รวมถึง ampเครื่องให้ความร้อน) ที่ผลิตความร้อน
- การบริการ: ส่งต่อการบริการทั้งหมดไปยังช่างบริการที่ผ่านการรับรอง จำเป็นต้องเข้ารับบริการเมื่ออุปกรณ์ได้รับความเสียหายแต่อย่างใด
- แบตเตอรี่: ทิ้งแบตเตอรี่ที่ใช้แล้วตามระเบียบข้อบังคับของท้องถิ่น ห้ามวางแบตเตอรี่ไว้ในที่ที่มีความร้อนสูงเกินไป
3. เนื้อหาบรรจุภัณฑ์
กรุณาตรวจสอบว่ารายการต่อไปนี้รวมอยู่ในแพ็คเกจของคุณ:
- Quantum J-32U Portable Audio System
- สายไฟ AC
- คู่มือการใช้งาน (เอกสารนี้)
4. สินค้าหมดview
4.1 แผงด้านหน้า
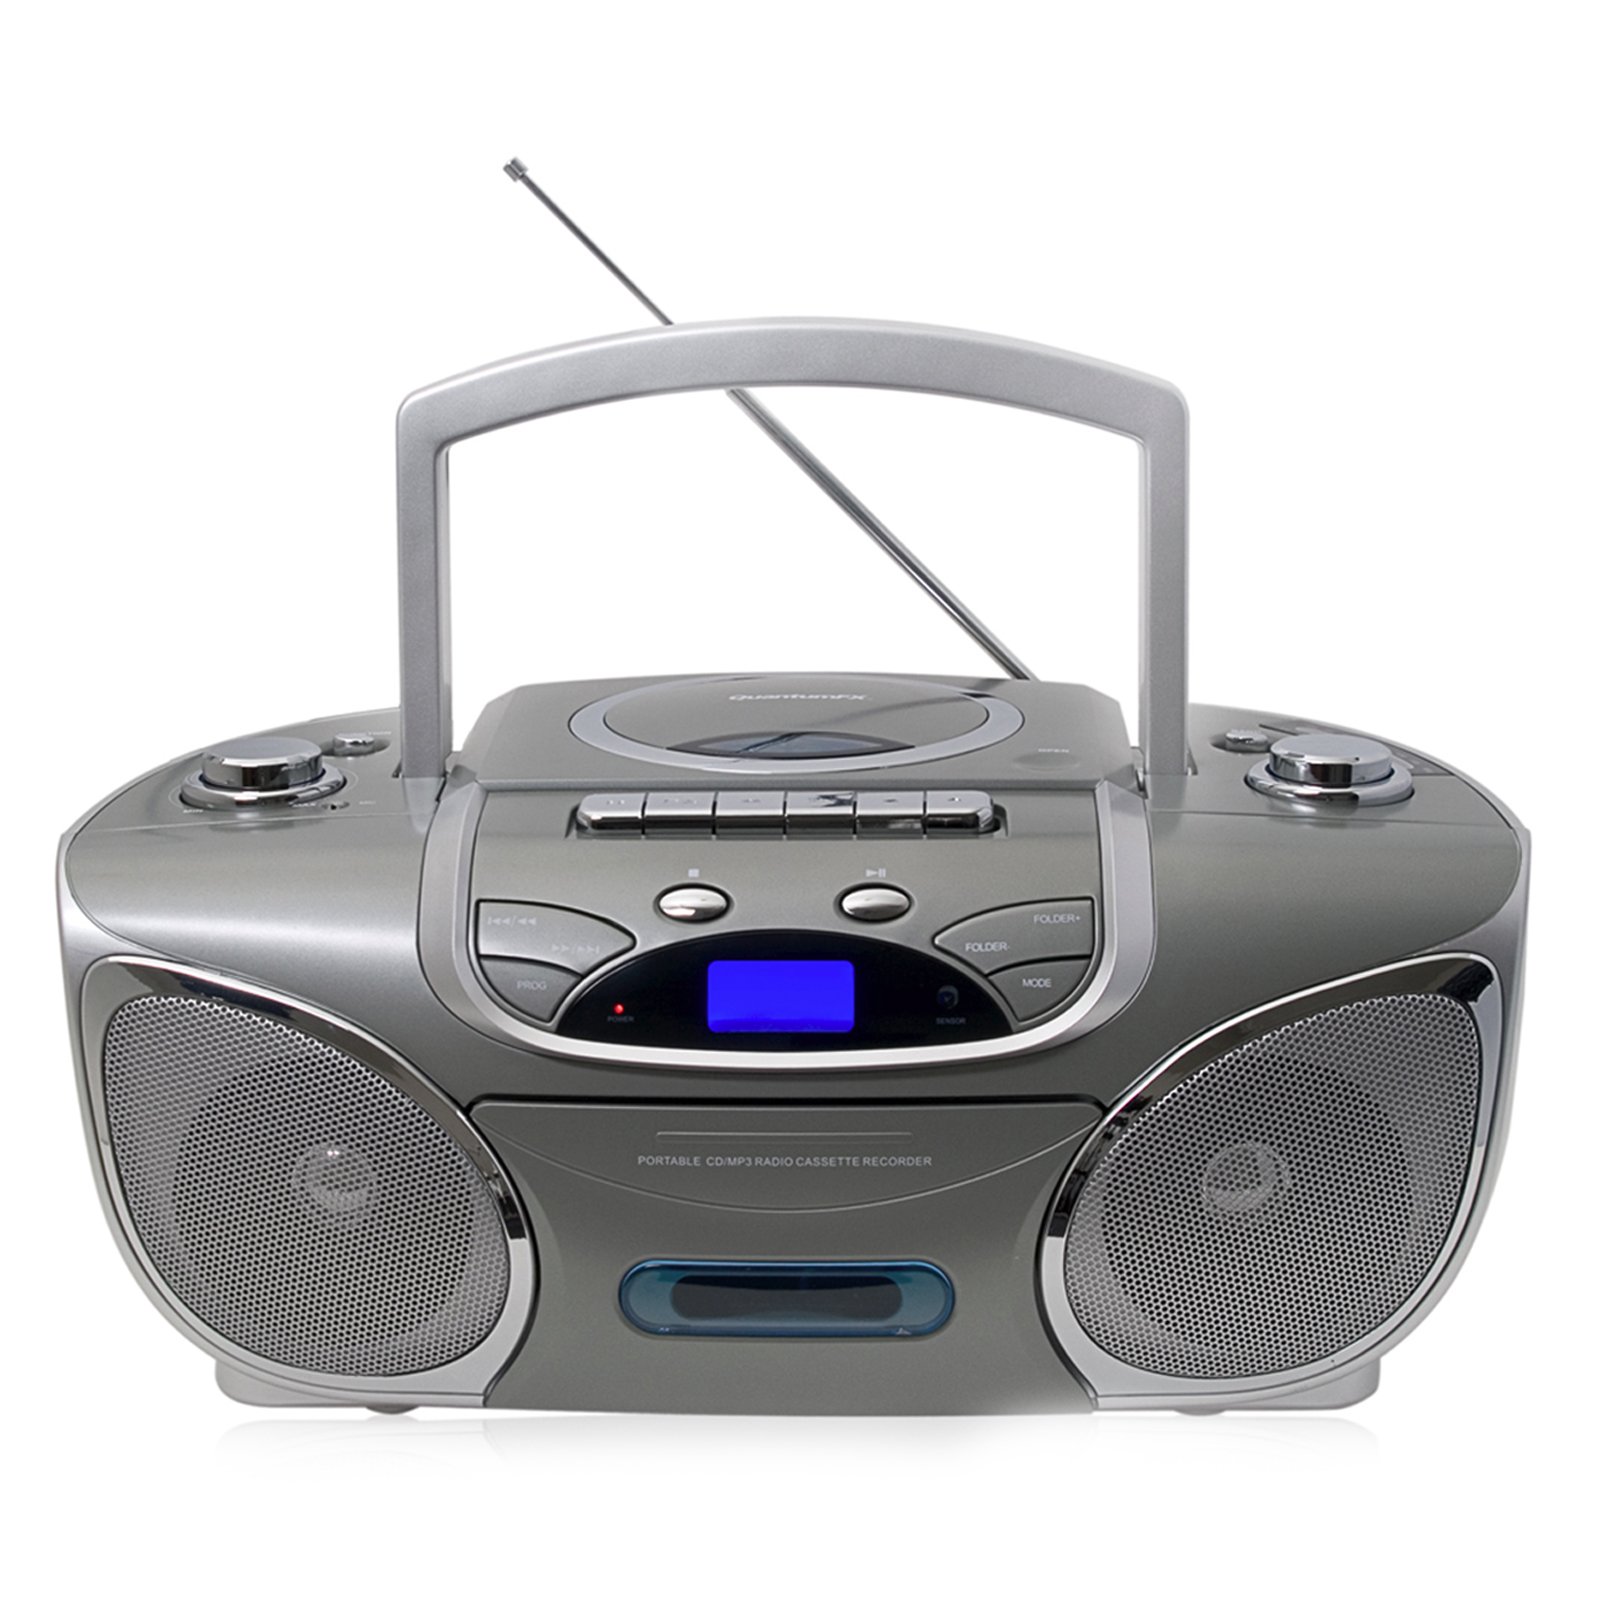
ภาพ: ด้านหน้า view of the Quantum J-32U, showing the speaker grilles, display, and control buttons.
- วิทยากร: ลำโพงสเตอริโอเพื่อเอาท์พุตเสียง
- จอแสดงผล LCD: แสดงโหมดปัจจุบัน หมายเลขแทร็ก และความถี่วิทยุ
- ปุ่มฟังก์ชั่น: Play/Pause, Stop, Skip/Search (Forward/Backward).
- การควบคุมระดับเสียง: ปุ่มหมุนสำหรับปรับระดับเสียงออก
- ปุ่มโหมด: Selects between CD, USB/SD, Radio, and Cassette modes.
4.2 แผงด้านบน
ภาพ: ด้านบน view of the Quantum J-32U, highlighting the CD compartment, cassette deck, USB port, and SD/MMC slot.
- ช่องใส่ซีดี: Top-loading CD/MP3 disc tray.
- ช่องใส่เทปคาสเซ็ท: สำหรับการเล่นและบันทึกเทปคาสเซ็ท
- พอร์ต USB: สำหรับการเชื่อมต่อแฟลชไดรฟ์ USB
- ช่องเสียบการ์ด SD/MMC: For inserting SD or MMC memory cards.
- ปุ่มปรับ: For manual radio frequency selection.
- ปุ่มควบคุมเทปคาสเซ็ท: Play, Record, Fast Forward, Rewind, Stop/Eject.
4.3 แผงด้านหลัง
ภาพ: ด้านหลัง view of the Quantum J-32U, showing the AC power input and battery compartment.
- อินพุตไฟ AC: Connect the supplied AC power cord here.
- ช่องใส่แบตเตอรี่: For inserting batteries for portable operation.
- เสาอากาศ FM: เสาอากาศแบบยืดหดได้สำหรับรับสัญญาณวิทยุ FM
5. การตั้งค่า
5.1 การจ่ายไฟให้กับอุปกรณ์
The J-32U can be powered by AC mains or batteries.
ไฟฟ้ากระแสสลับ
- ตรวจสอบให้แน่ใจว่าได้ปิดเครื่องแล้ว
- Connect the supplied AC power cord to the AC power input on the rear panel of the unit.
- เสียบปลายอีกด้านหนึ่งของสายไฟ AC เข้ากับเต้ารับไฟฟ้าที่ผนังมาตรฐาน
พลังงานแบตเตอรี่
- เปิดฝาช่องใส่แบตเตอรี่ที่แผงด้านหลัง
- Insert the required number of "C" size batteries (not included), ensuring correct polarity (+/-).
- ปิดฝาช่องใส่แบตเตอรี่ให้แน่น
- บันทึก: Disconnect the AC power cord when operating on batteries.
6. คู่มือการใช้งาน
6.1. การดำเนินการทั่วไป
- เปิด/ปิดเครื่อง: กดปุ่ม พลัง ปุ่มเพื่อเปิดหรือปิดเครื่อง
- การเลือกโหมด: กดปุ่ม โหมด button repeatedly to cycle through CD, USB/SD, Radio (AM/FM), and Cassette modes.
- การปรับระดับเสียง: หมุน ปริมาณ ปุ่มหมุนสำหรับเพิ่มหรือลดระดับเสียง
6.2 การเล่นซีดี/MP3
- กดปุ่ม โหมด ปุ่มเพื่อเลือกโหมดซีดี
- เปิดฝาช่องใส่ซีดี
- วางแผ่นซีดีหรือแผ่น MP3 โดยให้ด้านที่มีฉลากหันขึ้นด้านบน
- Close the CD compartment cover. The unit will read the disc.
- กดปุ่ม เล่น/หยุดชั่วคราว ปุ่มเพื่อเริ่มเล่น
- กด ข้ามไปข้างหน้า or ข้ามย้อนกลับ to navigate tracks.
- กดค้างไว้ ข้ามไปข้างหน้า or ข้ามย้อนกลับ to fast forward or rewind within a track.
- กดปุ่ม หยุด ปุ่มเพื่อหยุดเล่น
6.3 USB/SD/MMC Playback
- เสียบแฟลชไดรฟ์ USB เข้ากับพอร์ต USB หรือเสียบการ์ด SD/MMC เข้ากับช่องเสียบการ์ด
- กดปุ่ม โหมด button to select USB/SD mode. The unit will automatically detect and begin playing MP3 files.
- ใช้ เล่น/หยุดชั่วคราว, หยุด, ข้ามไปข้างหน้า, และ ข้ามย้อนกลับ ปุ่มต่างๆ เหมือนกับปุ่มเล่นซีดี
6.4 Radio Operation (AM/FM Stereo)
- กดปุ่ม โหมด ปุ่มสำหรับเลือกโหมดวิทยุ
- ยืดเสาอากาศแบบยืดหดได้สำหรับคลื่นวิทยุ FM เพื่อการรับสัญญาณที่ดีขึ้น สำหรับคลื่นวิทยุ AM ให้หมุนตัวเครื่องเพื่อการรับสัญญาณที่ดีที่สุด
- หมุน การปรับแต่ง หมุนปุ่มเพื่อเลือกสถานีวิทยุที่คุณต้องการ
- The frequency will be displayed on the LCD screen.
6.5 การเล่นและการบันทึกเทปคาสเซ็ต
การเล่นซ้ำ
- กดปุ่ม โหมด button to select Cassette mode.
- กดปุ่ม หยุด/นำออก button to open the cassette deck.
- Insert a cassette tape and close the deck.
- กดปุ่ม เล่น ปุ่มเพื่อเริ่มเล่น
- ใช้ ก้าวไปข้างหน้าอย่างรวดเร็ว or ย้อนกลับ ปุ่มสำหรับนำทางเทป
- กด หยุด/นำออก เพื่อหยุดการเล่น
Recording (from CD/USB/SD/Radio)
- ใส่เทปคาสเซ็ตเปล่าลงในเครื่องเล่นเทป
- Select the desired source (CD, USB/SD, or Radio) using the โหมด ปุ่ม.
- Start playback on the source (e.g., play a CD track, tune to a radio station).
- While the source is playing, press the บันทึก ปุ่มบนเครื่องเล่นเทป เล่น ปุ่มก็จะทำงานเช่นกัน
- หากต้องการหยุดบันทึก ให้กด หยุด/นำออก ปุ่ม.
- บันทึก: Ensure the cassette tape has its record protection tabs intact for recording.
7. การบำรุงรักษา
- การทำความสะอาดหน่วย: ใช้ผ้านุ่มและแห้งเช็ดทำความสะอาดภายนอกตัวเครื่อง ห้ามใช้น้ำยาทำความสะอาดที่มีฤทธิ์กัดกร่อนหรือตัวทำละลาย
- การทำความสะอาดเลนส์ซีดี: หากการเล่นซีดีมีปัญหา ให้ใช้แผ่นทำความสะอาดเลนส์ซีดีที่มีจำหน่ายทั่วไปเพื่อทำความสะอาดเลนส์เลเซอร์
- การทำความสะอาดหัวอ่านเทปคาสเซ็ต: Periodically clean the cassette deck's heads, pinch rollers, and capstan with a cotton swab lightly dampเคลือบด้วยแอลกอฮอล์ไอโซโพรพิล
- พื้นที่จัดเก็บ: When not in use for extended periods, disconnect the AC power cord and remove batteries. Store the unit in a cool, dry place.
8 การแก้ไขปัญหา
| ปัญหา | สาเหตุที่เป็นไปได้ | สารละลาย |
|---|---|---|
| ไม่มีไฟฟ้า | สายไฟ AC ไม่ได้เชื่อมต่อ; แบตเตอรี่หมดหรือใส่ไม่ถูกต้อง | ตรวจสอบการเชื่อมต่อสายไฟ AC เปลี่ยนแบตเตอรี่หรือตรวจสอบให้แน่ใจว่าขั้วถูกต้อง |
| ไม่มีเสียง | Volume too low; Incorrect mode selected. | Increase volume; Press โหมด to select correct source. |
| แผ่นซีดีเล่นสะดุดหรือไม่เล่นเลย | Disc dirty or scratched; CD compartment not closed; Disc inserted incorrectly. | Clean or replace disc; Close CD compartment firmly; Insert disc label side up. |
| การรับสัญญาณวิทยุไม่ดี | เสาอากาศไม่ยืดออก ตำแหน่งของหน่วย | ยืดเสาอากาศ FM ให้สุด; หมุนเครื่องเพื่อการรับสัญญาณ AM ที่ดีขึ้น |
| เทปคาสเซ็ตเล่น/บันทึกไม่ได้ | Tape incorrectly inserted; Record protection tab removed (for recording). | Ensure tape is correctly inserted; Cover record protection tab with tape for recording. |
9. ข้อมูลจำเพาะ
- แบบอย่าง: เจ-32ยู
- แหล่งพลังงาน: AC 120V ~ 60Hz or DC 9V (6 x "C" size batteries)
- เครื่องเล่นซีดี: Top-loading CD/MP3 compatible
- USB/SD/MMC: Supports MP3 audio playback
- ความถี่วิทยุ: ระบบสเตอริโอ AM/FM
- ช่องใส่เทปคาสเซ็ท: Playback and Recording function
- วิทยากร: สเตอริโอ
- อุปกรณ์ที่รองรับ: MP3 Player, Smartphone (via USB/SD for file playback, not direct audio input)
- GTIN: 606540009864
10. การรับประกันและการสนับสนุน
Quantum products are designed for reliability and performance. For warranty information, please refer to the warranty card included with your purchase or visit the official Quantum website. For technical support or service inquiries, please contact Quantum customer service.
การสนับสนุนทางออนไลน์: www.quantumfx.com/support (หมายเหตุ: นี่เป็นเพียงตัวอย่างชั่วคราว URL as no specific support link was provided.)
บริการลูกค้า: Refer to your product packaging or warranty card for contact details.