
1. บทนำ
The Intermatic EI500WC is a 7-day single-pole digital time switch designed for automated control of lights, fans, pumps, and other medium-duty loads. It offers up to 7 ON and 7 OFF operations per week, providing flexibility for energy savings, security, and convenience. This timer is compatible with incandescent, fluorescent, CFL, and LED lighting.
This manual provides detailed instructions for the safe installation, setup, programming, and maintenance of your EI500WC digital time switch.

Figure 1: Intermatic EI500WC Digital Time Switch installed in a standard wall plate.
2. ข้อควรระวังเพื่อความปลอดภัย
Please read and understand all instructions before installing or operating this device. Failure to follow these instructions may result in electrical shock, fire, or serious injury.
- คำเตือน: Risk of Electric Shock. Disconnect power at the circuit breaker or fuse box before installation or servicing.
- การติดตั้งจะต้องดำเนินการโดยช่างไฟฟ้าที่มีคุณสมบัติตามมาตรฐานไฟฟ้าท้องถิ่นและระดับชาติทั้งหมด
- Do not use this device with loads exceeding its specified electrical ratings.
- ตรวจสอบให้แน่ใจว่าการเชื่อมต่อสายไฟทั้งหมดมีความปลอดภัยและมีฉนวนหุ้มอย่างเหมาะสม
- อุปกรณ์นี้มีไว้สำหรับใช้ภายในอาคารเท่านั้น
3. เนื้อหาบรรจุภัณฑ์
- Intermatic EI500WC 7-Day Digital Time Switch
- ลวดถั่ว
- คู่มือการใช้งาน (เอกสารนี้)
4. สินค้าหมดview
The EI500WC features a clear digital display and intuitive buttons for programming. The main ON and OFF buttons are visible on the front, while programming buttons are located behind a hinged cover.

รูปที่ 2 : ด้านหน้า view of the EI500WC with the programming button cover open, showing CLK, DAY, PROG, RESET, HOUR, MIN, and MODE buttons.
5. คำแนะนำในการติดตั้ง
5.1. เครื่องมือที่จำเป็น
- ไขควง (แบบฟิลิปส์และ/หรือแบบแบน)
- คีมปอกสายไฟ
- เล่มที่tage เครื่องทดสอบ
- เทปพันสายไฟ
5.2. คำแนะนำในการเดินสายไฟ
- ปิดไฟ: Locate the circuit breaker or fuse that controls the switch you are replacing and turn it OFF. Verify power is off using a voltagอีผู้ทดสอบ
- ถอดสวิตช์เก่าออก: ถอดแผ่นปิดผนังและสวิตช์เดิมออกจากกล่องไฟฟ้าอย่างระมัดระวัง
- ระบุสายไฟ: The EI500WC requires a neutral wire. Identify the LINE (hot), LOAD, NEUTRAL, and GROUND wires in your electrical box. If a neutral wire is not present, consult a qualified electrician.
- เชื่อมต่อสายไฟ: Use the provided wire nuts to connect the EI500WC wires to your household wiring as shown in the diagram below.
- Black wire (LINE): Connect to the incoming hot wire from the circuit breaker.
- Red wire (LOAD): Connect to the wire going to the light fixture or appliance.
- White wire (NEUTRAL): Connect to the neutral wire (typically white) in the electrical box.
- Green wire (GROUND): Connect to the bare copper or green ground wire in the electrical box.
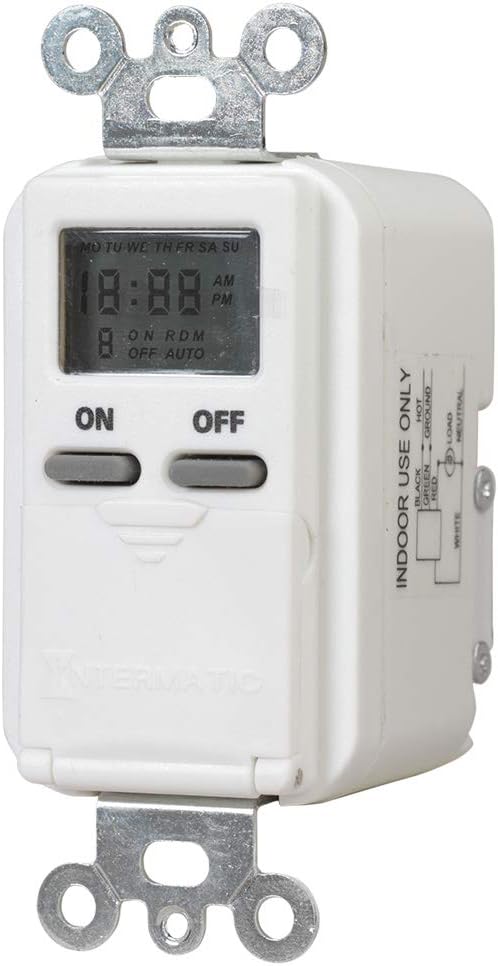
Figure 3: Wiring diagram for the EI500WC, showing connections for LINE (Black), LOAD (Red), NEUTRAL (White), and GROUND (Green).
5.3. การติดตั้ง
- Carefully push the wired timer into the electrical box, ensuring wires are not pinched.
- Secure the timer to the electrical box using the mounting screws.
- Attach the wall plate (not included) over the timer.
- คืนพลังงาน: เปิดไฟอีกครั้งที่เบรกเกอร์
6. การตั้งค่าเริ่มต้น
เมื่อเปิดเครื่องครั้งแรกหรือหลังจากปิดเครื่องtage, the display may show '12:00 AM' and 'MO'. The internal battery maintains settings during brief power interruptions.
6.1 การตั้งเวลาและวันปัจจุบัน
- Open the hinged cover to access the programming buttons (refer to Figure 2).
- กดปุ่ม ซีแอลเค ปุ่มแสดงเวลาจะกะพริบ
- กดปุ่ม ชั่วโมง button to set the current hour. Observe the AM/PM indicator.
- กดปุ่ม นาที ปุ่มสำหรับตั้งค่าเวลาปัจจุบัน
- กดปุ่ม วัน ปุ่มสำหรับตั้งวันในสัปดาห์ปัจจุบัน (จันทร์, อังคาร, พุธ, พฤหัสบดี, ศุกร์, เสาร์, อาทิตย์)
- กด ซีแอลเค again to save the settings and exit time setting mode.
7. การดำเนินการและการเขียนโปรแกรม
The EI500WC allows for up to 7 ON and 7 OFF programming events per week. Each event can be set for a specific day or combination of days.
7.1. การตั้งค่าโปรแกรมเปิด/ปิด
- เปิดฝาบานพับ
- กดปุ่ม โปรเจกต์ กดปุ่ม หน้าจอจะแสดง '1 ON' และเวลาจะกะพริบ
- กด ชั่วโมง และ นาที เพื่อตั้งเวลาเปิดที่ต้องการสำหรับโปรแกรมที่ 1
- กด วัน to select the day(s) for this program. Options include individual days, weekdays (MO TU WE TH FR), weekends (SA SU), or all days (MO TU WE TH FR SA SU).
- กด โปรเจกต์ อีกครั้ง หน้าจอจะแสดง '1 OFF' และเวลาจะกะพริบ
- กด ชั่วโมง และ นาที เพื่อตั้งเวลาปิดที่ต้องการสำหรับโปรแกรมที่ 1
- กด วัน to select the day(s) for this OFF program (should match the ON program days).
- Repeat steps 2-7 for additional ON/OFF programs (up to 7 pairs). To skip a program, press โปรเจกต์ repeatedly until you reach the desired program number or exit programming mode.
- กด ซีแอลเค to exit programming mode and return to normal operation.
7.2. โหมดสุ่ม
The random mode feature varies the ON/OFF schedule by a few minutes, providing a 'lived-in' appearance for enhanced security.
- To activate Random Mode: Press the โหมด button until 'RDM' appears on the display.
- To deactivate Random Mode: Press the โหมด button until 'RDM' disappears.
7.3. คู่มือการแทนที่
You can manually turn the connected load ON or OFF at any time without affecting the programmed schedule.
- กดขนาดใหญ่ ON button to manually turn the load ON.
- กดขนาดใหญ่ ปิด button to manually turn the load OFF.
- The timer will revert to its programmed schedule at the next scheduled ON or OFF event.
8. การบำรุงรักษา
8.1. ข้อมูลแบตเตอรี่
The EI500WC includes an internal battery that provides backup power to maintain time and program settings during power outages. This battery is typically long-lasting and not user-replaceable. If the display is blank or settings are lost frequently after power interruptions, the unit may need replacement.
8.2. การทำความสะอาด
Clean the surface of the timer with a soft, damp ผ้า ห้ามใช้สารทำความสะอาดที่มีฤทธิ์กัดกร่อนหรือตัวทำละลาย
9 การแก้ไขปัญหา
- Timer display is blank: Ensure power is supplied to the circuit. Check circuit breaker.
- อุปกรณ์ไม่เปิด/ปิดตามที่ตั้งโปรแกรมไว้:
- Verify current time and day are set correctly.
- Check that ON/OFF programs are set for the correct times and days.
- Ensure the timer is not in manual override mode conflicting with the program.
- ตรวจสอบให้แน่ใจว่าการเชื่อมต่อสายไฟแน่นหนาดีแล้ว
- ตัวจับเวลาจะสูญเสียการตั้งค่าหลังจากไฟดับtage: The internal backup battery may be depleted. The unit may require replacement.
- ปุ่มรีเซ็ต: If the timer behaves erratically, use a pointed object (like a paperclip) to press the recessed รีเซ็ต button. This will clear all settings and restore default values, requiring you to re-enter time, day, and programs.
10. ข้อมูลจำเพาะทางเทคนิค
| คุณสมบัติ | ข้อมูลจำเพาะ |
|---|---|
| หมายเลขรุ่น | EI500WC |
| เล่มที่tage | 125 VAC, 60 เฮิร์ตซ์ |
| โหลดสูงสุด | 15 Amps (1875 Watts) Resistive, 1000 Watts Tungsten |
| โหลดมอเตอร์ | 1 / 4 เอชพี |
| จำนวนโปรแกรม | Up to 7 ON/OFF events per week |
| ประเภทสวิตซ์ | ขั้วเดี่ยว (1 ทาง) |
| ประเภทการติดตั้ง | Decorator Wall Plate/Standard Wall Box |
| ขนาด (สูง x กว้าง x ลึก) | 2.75" x 1.75" x 1.36" |
| สี | สีขาว |
| การรับรอง | ได้รับการรับรองจาก UL |
11. ข้อมูลการรับประกัน
Intermatic warrants this product to be free from defects in material and workmanship for a period of one (1) year from the date of purchase. This warranty covers replacement of the unit only and does not include labor costs associated with removal or reinstallation.
This warranty does not apply to defects resulting from improper installation, misuse, abuse, accident, or unauthorized modifications. For warranty service, please contact Intermatic customer support.
12. การสนับสนุนลูกค้า
If you have any questions regarding the installation, operation, or troubleshooting of your Intermatic EI500WC Digital Time Switch, please refer to the Intermatic website or contact their customer support directly. Always have your model number (EI500WC) available when contacting support.