
การแนะนำ
Thank you for choosing the Technoline WT 182 Radio-Controlled Alarm Clock. This manual provides detailed instructions for the setup, operation, and maintenance of your new device. Please read this manual thoroughly before use and keep it for future reference. The WT 182 is designed to provide accurate time, indoor temperature, date, and day of the week, along with a reliable alarm function.
ข้อมูลด้านความปลอดภัย
- อย่าให้เครื่องสัมผัสกับอุณหภูมิที่สูงหรือต่ำเกินไป แสงแดดโดยตรง หรือความชื้นสูง
- หลีกเลี่ยงการทำอุปกรณ์หล่นหรือกระแทกอย่างรุนแรง
- อย่าใช้แบตเตอรี่เก่าและใหม่ผสมกัน หรือแบตเตอรี่ประเภทต่างๆ
- ถอดแบตเตอรี่ที่หมดออกทันทีเพื่อป้องกันการรั่วไหล
- ทิ้งแบตเตอรี่ตามระเบียบข้อบังคับในท้องถิ่น
- อย่าพยายามถอดประกอบหรือซ่อมแซมเครื่องด้วยตัวเอง แนะนำให้ส่งช่างผู้ชำนาญการไปรับบริการทั้งหมด
เนื้อหาแพ็คเกจ
โปรดตรวจสอบว่าสินค้าทั้งหมดมีอยู่และอยู่ในสภาพดี:
- Technoline WT 182 Radio-Controlled Alarm Clock Unit
- คู่มือการใช้งาน (เอกสารนี้)
บันทึก: 2 x AA Mignon LR06 batteries are required and are not included in the package.
สินค้าเกินview
The Technoline WT 182 features a clear digital display showing time, date, day of the week, and indoor temperature. It includes an alarm with a snooze function and a backlight for easy viewในสภาพแสงน้อย

รูปที่ 1 : ด้านหน้า view of the Technoline WT 182 alarm clock, displaying the current time, date, day of the week, and indoor temperature. The 'RADIO CONTROLLED' text is visible at the top, and 'techno line' branding is at the bottom.

รูปที่ 2: ด้านบน view of the alarm clock, highlighting the 'SNOOZE LIGHT' button located on the top edge of the device. This button is used to activate the backlight and the snooze function.

รูปที่ 3: ด้านหลัง view of the alarm clock, showing the battery compartment cover and the product information label. The label includes manufacturer details and the model number WT 182.
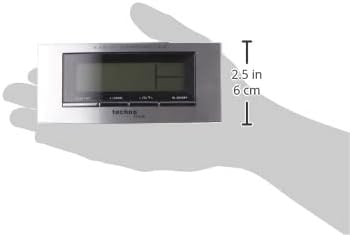
Figure 4: The alarm clock held in a hand, providing a visual reference for its compact dimensions (approximately 14 cm wide and 6 cm high).
การตั้งค่า
1. การติดตั้งแบตเตอรี่
- Open the battery compartment cover on the back of the unit (refer to Figure 3).
- Insert 2 new AA Mignon LR06 batteries, observing the correct polarity (+ and - markings).
- ปิดฝาช่องใส่แบตเตอรี่ให้แน่น
2. Initial Setup and Radio Control
Upon battery insertion, the clock will automatically start searching for the DCF-77 radio signal. This process can take several minutes. During this time, the radio control icon will flash on the display. Once the signal is received, the exact time will be set automatically, and the icon will become steady.
- Place the clock near a window for better signal reception.
- ควรหลีกเลี่ยงการวางไว้ใกล้กับอุปกรณ์อิเล็กทรอนิกส์ที่อาจก่อให้เกิดการรบกวน
3. Manual Time and Date Setting (if radio signal is unavailable)
If the radio signal cannot be received, or if you wish to set the time manually:
- Press and hold the 'MODE' button (usually located on the front or side) for a few seconds until the time display starts flashing.
- Use the '+' or '-' buttons (often labeled 'ADJ' or similar) to adjust the hour, then press 'MODE' to confirm and move to minutes.
- ทำซ้ำขั้นตอนนี้สำหรับนาที ปี เดือน และวัน
- Press 'MODE' again to exit the setting mode.
4. การตั้งค่าโซนเวลา
The clock allows for a time zone adjustment of ± 12 hours. This is useful if you are in a region where the DCF-77 signal is received but the local time zone differs from Central European Time.
- In normal time display mode, press and hold the 'ADJ' or similar button until the time zone offset starts flashing.
- Use the '+' or '-' buttons to adjust the offset.
- Press the 'ADJ' button again to confirm and exit.
การดำเนินงาน
1. Time Display (12/24 Hour Format)
The clock can display time in either 12-hour (with AM/PM indicator) or 24-hour format.
- To switch between formats, briefly press the 'ADJ' or a dedicated 12/24H button.
2. Date and Day of the Week Display
The display shows the current date (Month-Day) and the day of the week. The day of the week can be displayed in 5 different languages.
- To change the day of the week language, press the 'MODE' button repeatedly until the language setting flashes, then use '+' or '-' to select.
3. Indoor Temperature Display
The clock continuously measures and displays the indoor temperature.
- The temperature is typically displayed in Celsius. There might be an option to switch to Fahrenheit by pressing a specific button (e.g., 'C/F' or 'ADJ' in temperature mode).
4. การตั้งปลุก
The WT 182 features a single alarm.
- Press the 'ALARM' button once to display the current alarm time.
- กดปุ่ม 'ALARM' ค้างไว้จนกว่าเวลาปลุกจะเริ่มกระพริบ
- Use the '+' or '-' buttons to set the desired alarm hour, then press 'ALARM' to confirm and move to minutes.
- Use the '+' or '-' buttons to set the desired alarm minutes, then press 'ALARM' to confirm and exit.
- To activate/deactivate the alarm, briefly press the 'ALARM ON/OFF' or 'ALARM' button. An alarm icon will appear/disappear on the display.
5. ฟังก์ชันเลื่อนปลุกและไฟแบ็คไลท์
เมื่อเสียงสัญญาณเตือนดังขึ้น:
- Press the 'SNOOZE/LIGHT' button (located on top, refer to Figure 2) to activate the snooze function. The alarm will pause for approximately 5 minutes and then sound again.
- To stop the alarm completely, press any other button (e.g., 'ALARM' or 'MODE'). The alarm will reset for the next day.
- To activate the backlight at any time, briefly press the 'SNOOZE/LIGHT' button. The backlight will illuminate for a few seconds.
การซ่อมบำรุง
การทำความสะอาด
เช็ดเครื่องเบาๆงamp ผ้าเช็ดทำความสะอาด ห้ามใช้น้ำยาทำความสะอาดที่มีฤทธิ์กัดกร่อนหรือตัวทำละลาย เพราะอาจทำให้หน้าจอหรือตัวเครื่องเสียหายได้asing.
การเปลี่ยนแบตเตอรี่
When the display becomes dim or the clock functions erratically, it is time to replace the batteries. Follow the battery installation steps in the 'Setup' section.
การแก้ไขปัญหา
| ปัญหา | สาเหตุที่เป็นไปได้ | สารละลาย |
|---|---|---|
| ไม่มีจอแสดงผลหรือจอแสดงผลมืด | แบตเตอรี่หมดหรือใส่ไม่ถูกต้อง | เปลี่ยนแบตเตอรี่ใหม่โดยตรวจสอบให้แน่ใจว่าใส่ขั้วถูกต้อง |
| แสดงเวลาที่ไม่ถูกต้อง | Poor radio signal reception or manual setting error. | Relocate the clock to an area with better signal. Perform manual time setting if radio signal is consistently poor. Check time zone setting. |
| นาฬิกาปลุกไม่ส่งเสียง | สัญญาณเตือนภัยไม่ได้เปิดใช้งานหรือตั้งค่าไม่ถูกต้อง | Ensure the alarm icon is visible on the display. Re-check alarm time settings. |
| แสงไฟไม่ทำงาน | Batteries are low or exhausted. | เปลี่ยนแบตเตอรี่ |
ข้อมูลจำเพาะ
- หมายเลขรุ่น:
- WT 182 (SMADH)
- ขนาด (ยาว x กว้าง x สูง):
- 140 x 35 x 63 มม. (5.5 x 1.4 x 2.5 นิ้ว)
- น้ำหนัก:
- 150 กรัม
- แหล่งพลังงาน:
- 2 x AA Mignon LR06 batteries (not included)
- ประเภทจอภาพ:
- ดิจิตอล
- รูปแบบเวลา:
- เลือกได้ 12/24 ชั่วโมง
- แสดงอุณหภูมิ:
- อุณหภูมิภายในอาคาร
- คุณสมบัติพิเศษ:
- Radio-controlled time (DCF-77), Date and Day of Week display (5 languages), Alarm with Snooze, Backlight
- วัสดุ:
- พลาสติก
- สี:
- สีเงิน/สีดำ
- โหมดการทำงาน:
- ดิจิตอล
- ประเภทการเคลื่อนไหว:
- ควอตซ์
- ใช้ในร่ม/กลางแจ้ง:
- ในร่ม
- ผู้ผลิต:
- PK
- ประเทศต้นกำเนิด:
- จีน
การรับประกันและการสนับสนุน
Technoline products are manufactured to high-quality standards. For information regarding warranty terms and conditions, please refer to the warranty card included with your purchase or visit the official Technoline webไซต์ สำหรับการสนับสนุนด้านเทคนิคหรือการสอบถามบริการ โปรดติดต่อผู้ค้าปลีกหรือผู้ผลิตของคุณโดยตรง
You can find more information and contact details on the official Technoline webเว็บไซต์: www.technoline.de