การเปิดเครื่องและการติดตั้ง


SMART CONTROLLER (x1) SENSOR PROBE (x1)
![]()
![]()
CONTROLLER PLATE BOLTS (x2) HEX NUTS (X3)
![]()
![]()
WOOD SCREWS (WALL HANG) (X2) WIRE TIE (X1)
ขั้นตอนที่ 1
Plug the sensor probe into the controller’s 3.mm jack. Set the probe near your plants in your grow tent for the most accurate reading.

ขั้นตอนที่ 2
Plug your device’s UIS connector into one of the controller’s ports to connect and power the controller.

ขั้นตอนที่ 3
Plug your UIS device’s power cord into an AC power outlet to power it.

You may use the included tie mounts and wire ties to manage the cords.
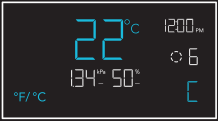
 เกินVIEW

a. CURRENT TIME
b. CURRENT LEVEL
c. COUNTDOWN
d. PROBE HUMIDITY
e. USER SETTING
f. ALERT ICONS
g. PROBE VPD
h. PROBE TEMP.
i. MODE
j. PORTS
1. Port Button – Cycles through all connected devices.
2. ปุ่มโหมด – Cycles through the controller’s programming modes.
3. Setting Button – Cycles through the controller settings.
4. Up/Down Buttons – Adjusts the parameters of the mode or setting you are in.
ENVIRONMENTAL GUIDE
Use either VPD or Temp/RH as a guide when programming your devices.
| พืชtage | วีพีดี | อุณหภูมิ | ความชื้นสัมพัทธ์ | ระยะเวลาแสง |
| การงอก | 0.2-0.8 กิโลปาสคาล | 70°-80 °F (21 °-27°C) | 70%-80% | 13+ Hours/Day |
| ต้นกล้า | 0.6-1.1 กิโลปาสคาล | 70°-80 °F (21 °-27°C) | 60%-70% | 13+ Hours/Day |
| พืชผัก | 0.6-1.4 กิโลปาสคาล | 70°-80 °F (21 °-27°C) | 50%-70% | 13+ Hours/Day |
| การออกดอก | 0.8-1.8 กิโลปาสคาล | 70°-80 °F (21 °-27°C) | 40%-60% | 12 Hours/Day |
Use the following steps to select the ideal programming for your device. Each port can run only one mode. Each mode’s functionality can be affected by certain controller settings.

- Select a PORT
ทั้งหมด 
1 2 3 4 - Select a MODE program for the port to run
OFF Mode / Min Level (pg. 4) ON Mode / Max Level (pg. 4) AUTO Mode (pg. 4) VPD Mode (pg. 5) TIMER TO ON Mode (pg. 5) TIMER TO OFF Mode (pg. 5) CYCLE Mode (pg. 6) SCHEDULE Mode (pg. 6) - Review การเขียนโปรแกรม that may affect modes
Max/Min Level Setting (pg.4)
Affects ALL Modes - Review การตั้งค่า that may affect modes
Transition Setting (pg.8)
Affects AUTO and VPD ModesBuffer Setting (pg.9)
Affects AUTO and VPD Modes - Return to resume programming
 โหมด
โหมด
OFF MODE (MIN LEVEL) / ON MODE (MAX LEVEL)
โหมดปิด
ตั้งค่าเป็น
3
ระดับต่ำสุด
Sets the minimum level your device will run at in all other modes.
ระดับ 
ในโหมด
ตั้งค่าเป็น
6
ระดับสูงสุด
Sets the maximum level your device will run at in all other modes.
ระดับ 
โหมดอัตโนมัติ
All four triggers can activate and run simultaneously. Turn off any triggers not in use by holding down the up and down buttons together.
HIGH TEMP. TRIGGER FOR COOLING FANS
Activates your device if temperature levels meet or exceed your set figure.
HIGH TEMP. TRIGGER
HIGH HUMID. TRIGGER FOR DEHUMIDIFIERS
Activates your device if relative humidity levels meet or exceed your set figure.
HIGH HUMID. TRIGGER
LOW TEMP. TRIGGER FOR HEATERS
Activates your device if temperature levels meet or fall below your set figure.
LOW TEMP. TRIGGER
LOW HUMID. TRIGGER FOR HUMIDIFIERS
Activates your device if relative humidity levels meet or fall below your set figure.
LOW HUMID. TRIGGER
VPD MODE
Measures the ambient temperature, relative humidity, and your plant’s leaf temperature. Monitoring this will help you create the ideal evaporation rate for your plant to ensure a steady flow of nutrients from its roots to the rest of its anatomy. VPD Mode is specifically designed for grow applications.

HIGH VPD TRIGGER
Activates your device if VPD levels meet or exceed your set figure.
HIGH VPD TRIGGER
LOW VPD TRIGGER
Activates your device if VPD levels meet or fall below your set figure.
LOW VPD TRIGGER
ตั้งเวลาไปที่โหมด
Sets a timer that will turn on your device at the end of the countdown. This mode will not repeat automatically but must be reset.
ตั้งเวลาปิด
(Countdown End Point)
ตั้งเวลาปิดโหมด
Sets a timer that will turn off your device at the end of the countdown. This mode will not repeat automatically but must be reset.
ตั้งเวลาเปิด
(Countdown End Point)
โหมดวงจร
Sets an ON duration and an OFF duration for your device to cycle through continuously. Both ON and OFF countdown timers must be set in order for your device to properly cycle.
ในอดีตที่ผ่านมาample, the ON duration is set to 30 minutes and the OFF duration is set to 1 hour.
Your device will turn on for 30 minutes and turn off for 1 hour. It will then turn on for 30 minutes again before turning off for 1 hour. This cycle will continue until you leave this mode.

โหมดกำหนดการ
Sets a daily schedule for your device to trigger on and off. Both ON and OFF clock times must be set in order for your device to be properly scheduled. The controller clock time must also be set under Settings in order for your device to properly follow schedules.
ในอดีตที่ผ่านมาample, the ON time is set to 9 AM and the OFF time is set to 7 PM. This will trigger your device to run between 9 AM to 7 PM on a daily basis while you remain in this mode.

 การตั้งค่า
การตั้งค่าการแสดงผลDIS
Adjusts display brightness and auto-dimming. Cycle through levels 1, 2, 3, A2 and A3. A2 and AS set the brightness level at 2 and 3, respectively, dimming to level 1 after 15 seconds of inactivity.

°F/°C การตั้งค่า
Changes the displayed units to Fahrenheit or Celsius. All displayed units automatically convert when adjusting this setting.
การตั้งค่านาฬิกา
Adjusts the current clock time. Cycling through 12:00 will automatically change the units to AM or PM.

การตั้งค่าการสอบเทียบ
Adjusts the temp. and humidity readings the sensor probe is measuring. The calibration cycle ranges from -20°F to 20°F (-10°C to 10°C) for temp. and -10% to 10% for humidity.

VPD LEAF OFFSET
Adjusts the sensor probe’s VPD reading in 1° increments. The calibration cycle ranges from -20°F to 20°F (or -10°C to 10°C).

Screen elements are enlarged for display purposes only.
TRANSITION SETTINGS
The transition setting adjusts how your device will shift between levels when triggered to run in AUTO Mode (temperature and/or humidity) or VPD Mode. In high triggers, this will create intervals above your set trigger point. In low triggers, this will create intervals below your set trigger point.
For each interval the probe reading passes, your device’s level will adjust by one. Please note your device’s levels will be limited by your min and max level settings.

การตั้งค่าบัฟเฟอร์
This setting creates a gap from your AUTO Mode temperature, humidity, and VPD triggers. This sets a separate trigger-off point to keep your device from triggering too quickly due to small climate fluctuations.
While a buffer setting is active, your device will stay on after triggering, remaining on even after the reading falls below your set trigger point. Your device will only turn off when the reading falls below the separate trigger-off point.
HIGH TRIGGEW
ในอดีตที่ผ่านมาample, your set trigger point is 89°F and buffer setting is 6°F. After turning on, your device will stay on until the temperature reaches 83°F.

- Trigger OFF point 83°F
- Trigger ON point 89°F
LOW TRIGGERS
ในอดีตที่ผ่านมาample, your set trigger point is 51 °F and buffer setting is 6°F. After turning on, your device will stay on until the temperature reaches 57°F.

- Trigger ON point 51°F
- Trigger OFF point 57°F
 ทางลัดตัวควบคุม
โรงงาน RESE
กดปุ่มโหมด ขึ้น และลง พร้อมกันเป็นเวลา 5 วินาทีเพื่อรีเซ็ตคอนโทรลเลอร์และคืนค่าเป็นการตั้งค่าจากโรงงาน
ถือ
![]()
![]()
![]()
ล็อคคอนโทรลเลอร์
กดปุ่มตั้งค่าค้างไว้เพื่อล็อคคอนโทรลเลอร์ของคุณในโหมดปัจจุบัน กดปุ่มตั้งค่าค้างไว้เพื่อปลดล็อคคอนโทรลเลอร์ของคุณ
ถือ
![]()
ซ่อนหน้าจอ
ล็อคคอนโทรลเลอร์ของคุณเพื่อไม่ให้สามารถปรับการตั้งค่าใดๆ ได้ ดูด้านบน จากนั้นกดปุ่มตั้งค่าเพื่อปิดจอแสดงผล การกดอีกครั้งจะทำให้จอแสดงผลเปิดขึ้นอีกครั้ง
กด
![]()
ข้ามไปที่โหมดปิด
กดปุ่มโหมดค้างไว้ 3 วินาทีในโหมดหรือการตั้งค่าใดๆ เพื่อข้ามไปที่โหมดปิดโดยอัตโนมัติ
ถือ
![]()
RESE ‘TO OFF/DEFALP
กดปุ่มขึ้นและลงค้างไว้ 2 วินาทีเพื่อรีเซ็ตค่าโหมดปัจจุบันหรือการตั้งค่าตัวควบคุมของคุณ
ถือ
![]()
![]()
ออโต้ อินเครASING หรือ DECREASING
กดปุ่มขึ้นหรือลงเพื่อเพิ่มหรือลดการตั้งค่าผู้ใช้โดยอัตโนมัติจนกว่าคุณจะปล่อย
HOLD HOLD
![]() OR
OR ![]()
ข้อมูลเพิ่มเติม

เยี่ยมชมเว็บไซต์ของเรา webไซต์ที่ www.acinfinity.com for more information on how to program CONTROLLER 69 PRO.
คำถามที่พบบ่อย

WEBเว็บไซต์ | www.acinfinity.com
อีเมล | support@acinfinity.com
โทรศัพท์ | 626-923-6399, 9 - 5 น. PST
ที่อยู่ | 21880 BAKER PARKWAY
เมืองแห่งอุตสาหกรรม CA 91789
ตัวแทนจำหน่าย
อีเมล | ตัวแทนจำหน่าย@acinfinity.com
โทรศัพท์ | 626-838-4656, 9 - 5 น. PST
การรับประกัน

โปรแกรมการรับประกันของเราคือคำมั่นสัญญาของเราที่มีต่อคุณซึ่งเป็นลูกค้ารายแรก ว่าผลิตภัณฑ์ที่จำหน่ายโดย AC Infinity Inc. จะปราศจากข้อบกพร่องเป็นเวลาสองปีนับจากวันที่ซื้อ หากคุณมีปัญหาใดๆ เกี่ยวกับผลิตภัณฑ์นี้ โปรดติดต่อเรา และเราจะยินดีแก้ไขปัญหาให้คุณหรือคืนเงินให้คุณเต็มจำนวน!
ลิขสิทธิ์ © 2023 AC INFINITY INC. สงวนลิขสิทธิ์
ห้ามคัดลอก คัดลอก คัดลอก ทำซ้ำ แปลหรือลดส่วนใดของวัสดุ รวมถึงกราฟิกหรือโลโก้ในคู่มือเล่มนี้เป็นสื่ออิเล็กทรอนิกส์หรือรูปแบบที่เครื่องอ่านได้ทั้งหมดหรือบางส่วน โดยไม่ได้รับอนุญาตเฉพาะจาก AC Infinity Inc.
คอนโทรลเลอร์ 69 PRO
คู่มือเริ่มต้นอย่างรวดเร็ว

![]()
![]()
เอซี อินฟินิตี้

CORNER RADIUS: 10mm
เอกสาร / แหล่งข้อมูล
 |
AC Infinity Controller 69 Independent Programs [พีดีเอฟ] คู่มือการใช้งาน 230510, CTR69P2305X1, Controller 69 Independent Programs, Controller 69, Independent Programs, Programs |